


Running AddressBook Viewer 63
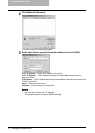
- Default Configuration - Type Selection — Select the default destination type that will
be enabled in the Type Selection dialog box, which appears when searching for the con-
tacts as the destinations of the network fax job. You can select either “Fax Number”,
“Email Address” or “Both” to set the default selection type. The “Fax Number” is set as
the factory default. This can be set only when the AddressBook Viewer is launched from
the N/W-Fax driver.
In this equipment, the type other than "Fax Number" cannot be selected.
4) Tools menu
The following commands can be selected in the Tools menu.
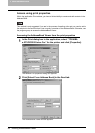
- LDAP Setting — Select this to configure the LDAP service to obtain the LDAP address
book from the LDAP server.
- Device Setting — Select this to find the device to obtain the public address book from
this equipment.
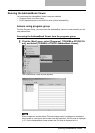
- Convert for TopAccess — Select this to convert the file format of the address book file
created by the backup or export function in TopAccess to the one for restoring or import-
ing the address book data in the address book in the following models. This menu is
available only when Windows 2000, Windows XP, Windows Vista, Windows Server 2003
or Windows Server 2008 is used.
This equipment (e-STUDIO165/205, e-STUDIO167/207/237, or e-STUDIO182/212/242),
e-STUDIO850 Series, e-STUDIO282 Series, e-STUDIO452 Series, e-STUDIO451C
Series, e-STUDIO3510C Series, e-STUDIO4520C Series, e-STUDIO6530C Series,
e-STUDIO455 Series, e-STUDIO855 Series
y To use “Convert for TopAccess”, Java 2 Runtime Environment V1.4.2 or later must be
installed.
y The Address Book Converter is displayed only when an OS with a 32-bit version is used.
5) Help
The following commands can be selected in the Help menu.
- Contents and Index — Select this to display the Online Help.
- About TOSHIBA e-STUDIO AddressBook Viewer — Select this to display the version
information.
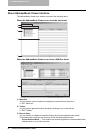
Toolbar
You can use the following tool icon to perform various functions quickly:
(New Contact) — Click this to add a new contact in the private address book. If the cur-
rently selected item is a group, the contact will be created as a member of the group. If the cur-
rently selected item is a contact or the address book, the contact will be created in the address
book. This icon is available only when selecting items in the private address book.
(New Group) — Click this to add a new group in the private address book. This icon is
available only when selecting the “Group” folder in the private address book.
(Copy) — Click this to copy the selected contacts or a group in the clipboard. The contacts
or a group copied in the clipboard can be pasted in the private address book. This icon is avail-
able only when selecting a group or contacts in any address book.
(Paste) — Click this to paste the contacts or a group copied in the clipboard in the private
address book. If the group has been copied, this item is available only when selecting a “Group”
folder. If contacts have been copied, this item is available only when selecting a group or "Loca-
tion/People" folder in the private address book.