1
2
3
3
4
5
7
8
8
7
Hardware Setup continued
• Ifthefollowingconditionsoccur,unplugthedevicefromthewalloutletandbringitto
qualiedservicepersonnelforrepair.
—The power cord or plug has become damaged or frayed.
—Liquid has been spilled into the device.
—Thedevicehasbeenexposedtorainorwater.
—The device has been dropped, or the cabinet has been damaged.
—Thedeviceexhibitsadistinctchangeinperformance,indicatinganeedfor
service.
—The device does not operate normally when the operating instructions are
followed.
• Onlyadjustthosecontrolsthatarecoveredintheoperatinginstructions.Improper
adjustmentofothercontrolsmayresultindamagethatwillrequireextensiveworkbya
qualiedtechniciantorepair.
Rackmount Installation
Usingtheincludedrackmounthardware,attachtherackmountbracketstotheKVMswitch.
DependingonwhetheryouwanttomounttheKVMswitchtothefrontorbackoftherack,
installtherackmountbracketstothefrontorbacksidesoftheKVMswitch.Usinguser-
supplied screws, fasten the rackmount brackets to the rack.
System Installation
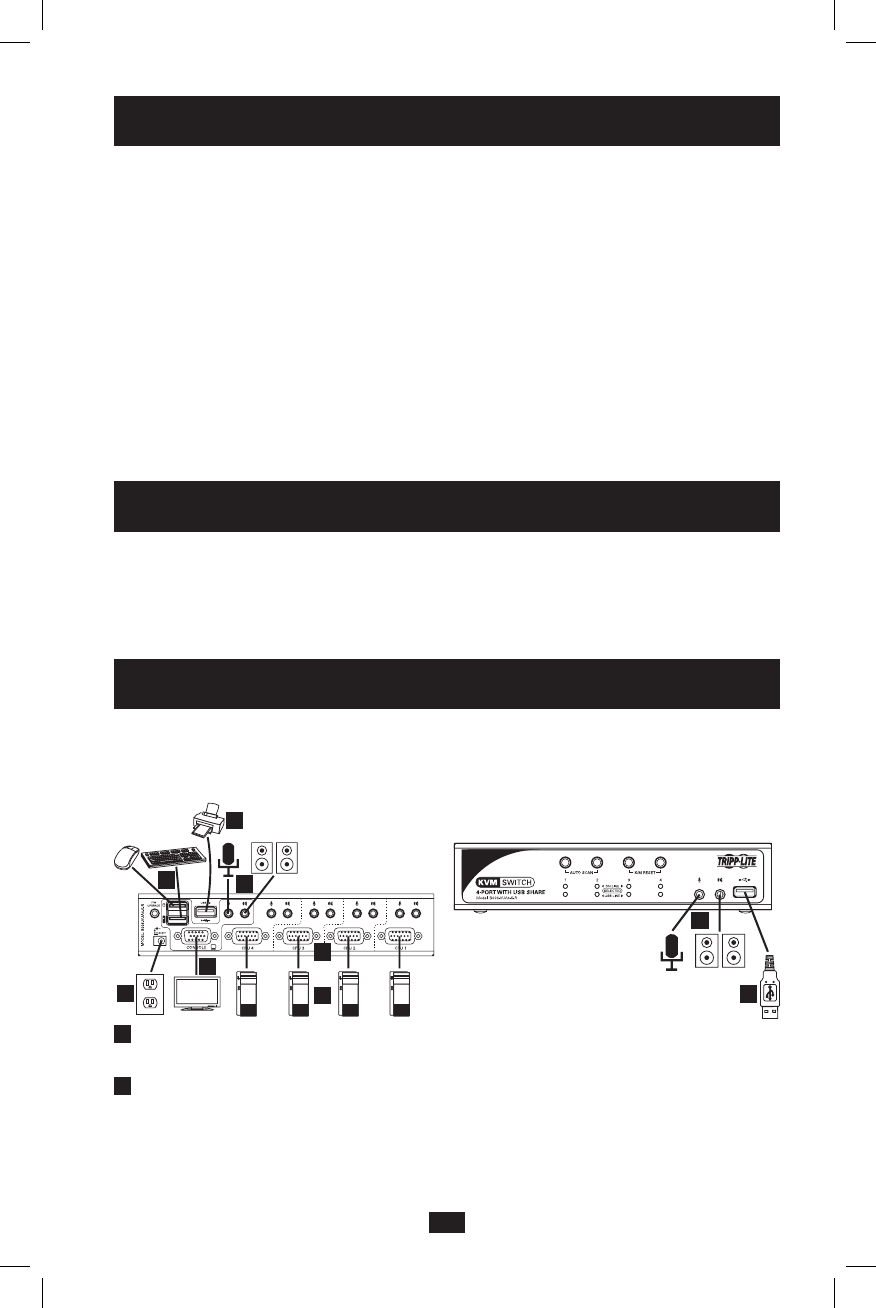
RefertothestepsanddiagramtosetupyourKVMswitchinstallation.Note: Before making any
connections, make sure that power to all devices being connected to the KVM switch is turned
off. Unplug the power cords of any computers that have the Keyboard Power On function.
1
ConnectyourmonitortotheHD15FemaleconsoleportonthebackpaneloftheKVM
switch.
2
Connect your USB keyboard and USB mouse to the corresponding USB console ports
onthebackoftheKVMswitch.IfyouhaveaPS/2keyboardand/ormouse,connectthe
includedUSBto(x2)PS/2adaptercabletooneoftheUSBconsoleportsonthebackof
theunit,andthenconnectyourPS/2keyboardand/ormousetothecorrespondingPS/2
connector(s)ontheadaptercable.Youcanconnectanycombinationofkeyboardand
mouse;USB–USB,PS/2–PS/2orUSB–PS/2.
201004198 93-2947.indd 7 4/23/2010 3:26:53 PM


