Static IP
B.3 Windows 2000
B
120
© 2008 Verizon. All Rights Reserved.
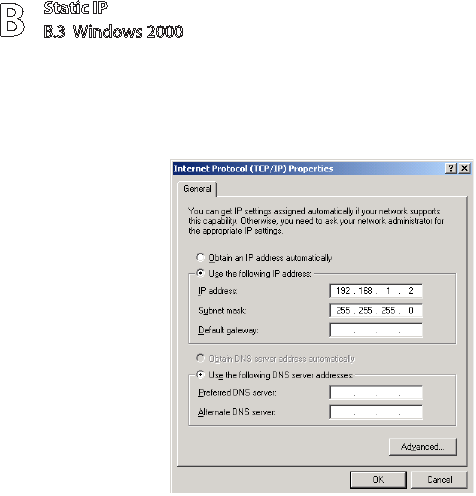
The “Internet Protocol (TCP/IP) Properties” window appears.9.
In the “General” tab, make sure the the circle next to “Use the following IP 10.
Address ” is selected. When active, a black dot appears in the circle. If the
circle already contains a black dot, leave it alone.
Enter the following numbers in the “IP Address” text box: 11. 192.168.1.2
Do not include the periods; they are automatically entered.
Enter the following numbers in the “Subnet mask” text box: 12. 255.255.255.0
Do not include the periods; they are automatically entered.
Click 13. OK. The “Internet Protocol (TCP/IP) Properties” window disappears.
In the “Local Area Connection Properties” window, click 14. OK. The Local Area
Connection Properties window disappears.
Click 15. Close in the Local Area Connection Status window. The window
disappears.
Close the Network and Dial-up Connections window by clicking on the “x” 16.
button at the upper right corner of the window.
The computer restarts. It is now set up with a static IP address, allowing the user
to access the Gateway’s Web Configuration Utilities (Advanced Setup, Utilities,
etc.).
