


2750 op#2 R3.doc 10-02 Page 2-1
Chapter 2
OPERATING INSTRUCTIONS
After installation ...
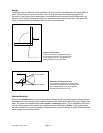
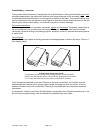
Your Printfold installer will have demonstrated how the folder operates with your printer or copier,
showing how the bridge can be pivoted vertically for access to the rear of the printing system, and also
how, in the event of a folder jam, documents are diverted to avoid a build-up of paper at the printer exit.
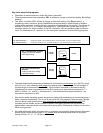
The Printfold Model 2750 Folder is self-programming, and so automatic in operation that there is really
very little for the operator to do. The folder turns on automatically when a document enters the bridge,
and turns off (times-out), when the flow of prints ceases. There is no need to figure the fold pattern for
each document, nor is it necessary to remember which fold types and sizes are possible with a given
width of media. All you have to do, as the operator, is select the desired style of fold from the control
panel, and empty the catch bin from time to time.
For an overview of the folder the user is referred to Chapter 1, which introduces the various fold
possibilities and illustrates the folder’s key features.
1
2
3
4
5
6
0
3
1
9
0
0
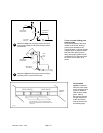
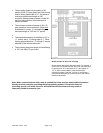
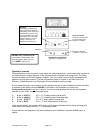
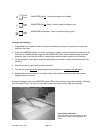
Power entry panel
(1) Power entry module
(2) Line cord receptacle (IEC-320)
(3)
ON/OFF rocker switch: 1 = ON, 0 = OFF
(4)
Fuse drawer (3AG type)
(5)
Linear Feet counter
(6)
Communications port (DB9-F)
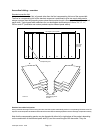
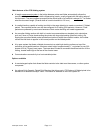
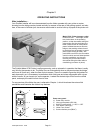
Model 2750 Folder (operator’s side)
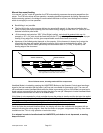
Features to note ... The bridge, shown
here locked down in the operating
position, so that documents exiting the
printer/copier flow into the bridge; the
tower (raised section at center) which
passes unfolded documents from the
bridge to the stacking surface formed
by the folder lids; the operator’s control
panel (upper surface of tower), with
push-buttons and LEDs; the removable
catch-bin which receives folded packets
from the crossfolder, and; the rear
receiving tray for accordion folded
documents exiting the folder without
crossfolding (not shown in photo).