


Configuring Custom Paper Sizes
3-62 ❖ User Guide
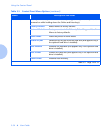
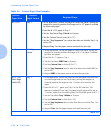
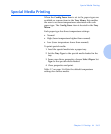
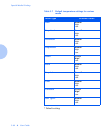
Table 3.6 Custom Paper Size Examples.
Custom
Paper Size
Desired
Input Source
Required Steps
8 x 10 in. Tray 1 1.In the application, format the page for Letter size paper, setting the
margins to correctly position the image on 8 x 10” paper if overlaid
by Letter size paper.
2. Load the 8 x 10” paper in Tray 1.
3. Set the Tray Menu
Tray 1 Mode
to
Custom
.
4. Set the Custom Size to
Letter (8.5x11”)
.
5. Set the “
Tray Sequence”
to a value that does not include Tray 1 (or
set to
Off
).
6. Request
Tray 1
as the paper source and send the print job.
6 x 7 in Multi Bypass
Feeder
1. In the application, format the page for Letter size paper, setting the
margins to correctly position the image on 6 x 7 in paper if overlaid
by Letter size paper.
2. Load the 6 x 7” paper in Tray 1.
3. Set the Tray Menu MBF Size to Custom.
4. Set the Custom Size to Letter (8.5 x11”).
5. Set the Tray Sequence item to value that does not include MBF (or
set to Off).
6. Request MBF as the paper source and send the print job.
8.5 x 11 in.
Short Edge
Feed (SEF)
Tray 1
1. In the application, format the page for Folio size paper (because Folio
is a short-edge feed size on this printer), setting the margins to
correctly position the image on the 11 inches to be used by this
paper.
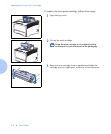
2. Load the 8.5 x 11” paper into Tray 1 in the SEF direction. This
requires a Ledger/A3 size tray. The paper length guide will be set to
11 inches, rather than the width guide. (Set the width guide to 8.5”.)
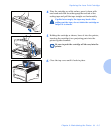
3. Set the Tray Menu Tray 1 Mode to Custom.
4. Set the Custom Size to Folio (8.5 x13”).
5. Set the Tray Sequence item to value that does not include Tray 1 (or
set to Off).
6. Request Tray 1 as the paper source and send the print job.
Table 3.6