


CentreWare® Internet Services
Xerox® Phaser® 3052/3260
User Guide
17
Configure Wireless Connectivity Using CentreWare Internet Services
(Phaser 3052NI, 3260DI, and 3260DNI)
Note: The machine will not connect to the wireless network while the network cable is attached.
1. At your workstation, open the Web browser and enter the IP Address of the machine in the
Address Bar.
2. Press Enter.
3. Select Properties.
4. If prompted, enter the admin for the ID and 1111 for the Password, and select Login.
5. Select Properties.
6. In the Network Settings link, select the Wi-Fi link. Then select the Wi-Fi link below that.
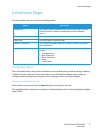
7. The Connection Status shows the Link Status of the wireless connection.
8. The Wireless Settings area provides options to configure wireless connectivity. The options are
Easy Wireless Settings and Advanced Settings, and are explained below.
Use the Easy Wireless Settings Wizard
1. Select the Easy Wi-Fi Settings Wizard button to have the machine find the WPS Settings
automatically. The SSID screen appears with a list of available wireless networks.
2. Select the required Network Name SSID and click Next.
3. If encryption is required:
a. Enter the WPA Shared Key.
b. Enter the Confirm Network Key and click Next.
4. The Wireless Setup Confirmation screen displays. Click Apply.
Configure Advanced Wireless Settings
1. Select the Advanced Settings Custom button. The Advanced Wireless Setup screen appears.
2. To enable Wireless Radio, select On from the Wireless Radio menu.
3. Select the required option for SSID:
• Select Search List and select the required network from the drop-down menu. Click the
Refresh button to update the list of networks available.
• Select Insert New SSID to enter a new wireless network name.
4. In the Security Setup area:
a. Select the required method of Authentication.
b. Select the required method of Encryption.
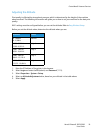
5. Depending on your selections you may be required to enter some or all of the following
information for the Network Key Setup.
a. Select the required option for
Using Key.
b. The Hexadecimal option may be enabled. Click the Hexadecimal check box to deselect if
required.
c. Enter the required Network Key and Confirm Network Key.
6. Depending on your selections you may be required to enter 802.1x Security Setup information.