Specialty Printing
Phaser™ 4400 Laser Printer 29
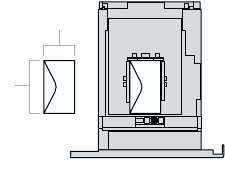
Printing envelopes from the Tray 1, 2, or 3
1. Insert the envelopes into the tray. For more information, refer to the Trays section of the Trays and
Paper Guide on the Interactive Documentation CD-ROM.
■ Place the side to be printed facedown.
■ The top of the envelopes should be toward the left of the printer.
2. When the front panel prompts you to set the paper type, scroll to
Envelope and press the
OK key to save your selection.
3. Set the tray for custom size paper and specify the dimensions:
a. On the front panel, with
Menus highlighted, press the OK key.
b. Scroll to
Printer Setup Menu by pressing the Down Arrow key and press the OK key.
c. Scroll to
Tray Setup Menu and press the OK key.
d. Scroll to
Tray # Setup Menu (where # is the number of the tray) and press the OK key.
e. If you don’t see a selection for
Set Custom X, scroll to Custom Size and press the
OK key to change
Custom Size to On.
f. Scroll to
Set Custom X and press the OK key.
g. Press the Down Arrow or Up Arrow key to scroll to the value for X, and then press the
OK key. (The X value is the measurement from the left to the right of the paper in the tray.)
h. Scroll to
Set Custom Y and press the OK key.
i. Press the Down Arrow or Up Arrow key to scroll to the value for Y, and then press the
OK key. (The Y value is the measurement from the front to the back of the paper in the tray.)
4. In the application, define the envelope size (page size).
5. In the printer driver, select Tray 1, 2, or 3 (the tray you just loaded) as the paper source, select the
envelope size, and select Envelope as the paper type.
6. Make a test print from your application to confirm that the orientation of your envelope is correct.
P4400-82
x
y


