


54
C
HAPTER
6: M
AINTAINING
THE
S
WITCH
4007
Removing and Replacing a Power Supply
This section describes how to remove and then
replace the 930-watt AC power supply
(Model Number 3CB9EP9) in the Switch 4007 chassis.
CAUTION:
When you replace a power supply, leave a
sufficient number of power supplies running at all
times to satisfy the power requirements of installed
modules. If you have an installed Enterprise
Management Engine (EME), enter the
show power
budget
command to display current power conditions
for the Switch 4007. If you determine that removal of
a defective, but still functioning, power supply will
not cause a power deficit in the Switch, you can
remove the faulty power supply without losing power
to any modules.
WARNING:
Before you attempt to remove a
930-watt AC power supply from the chassis, to avoid
contact with hazardous energy, be sure to set the
power supply’s Standby/On switch (Figure 24) to the
Standby position, and to disconnect the power cord
from both the electrical outlet and then the power
supply.
There are no user-serviceable parts on either the
load-sharing power supplies or on the fan trays. If
these components fail, remove them as described
here and return the components to your supplier.
Keep replacement power supply units and fan trays at
your site so that they are available if needed.
Removing a 930-watt Power Supply
The Switch 4007 chassis can accommodate up to two
930-watt modular load-sharing power supplies.
To remove a 930-watt power supply from a
Switch 4007 chassis:
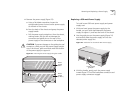
1
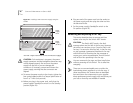
Set the power supply’s Standby/On switch (Figure 22),
which is located on the front of the power supply, to
the Standby position.
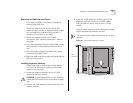
Figure 22
930-watt Power Supply Standby/On Switch
2
Remove the power cord from the electrical outlet.
3
Remove the power cord from the power supply’s AC
input socket.
Standby/On
switch
On positionStandby position