


Setting up Auto Network Connect 25
■ Hexadecimal keys are sequences of hexadecimal digits arranged into four keys.
A hexadecimal digit may be a letter from A to F or a number from 0 to 9. This
type of encryption is compatible with Wi-Fi certified equipment from other
manufacturers.
To enter an encryption string:
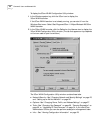
1 In the Security/Network window, select 40-bit Shared Key (Wi-Fi) from the Security
setting list.
2 Click Encryption Key Settings.
3 In the next window, select Specify Encryption String.
4 Type the encryption string in the space provided.
5 Click OK when finished.
To enter hexadecimal keys:
1 In the Security/Network window, select 40-bit Shared Key (Wi-Fi) from the Security
setting list.
2 Click Encryption Key Settings.
3 In the next window, select Specify Encryption Keys.
4 Enter the key settings.
You must enter settings for all four keys.
5 Click one of the radio buttons to select a key to use.
6 Click OK when finished.
128-bit Dynamic Security Link Settings
128-bit Dynamic Security Link security requires a user name and password. Ask
your network administrator for the user name and password.
1 In the Network/Security window, select
128-bit Dynamic Security Link from the
Security setting list.
2 Click Apply.
3 In the next window, type the user name and password in the spaces provided.
4 Click OK when finished.
After you log in successfully the first time, Windows remembers the password the
next time you log in. Your network administrator may require you to log on
every time.
Setting up Auto
Network Connect
Auto Network Connect ensures network association even when traversing
subnets. The client automatically associates with the nearest access point that has
compatible encryption settings and automatically obtains a valid IP address.
This option requires a Dynamic Host Control Protocol (DHCP) server. The client’s
network configuration must be set to obtain its IP address automatically. For more
information on DHCP, see the documentation for your operating system.