


2-2 AcerRouter 700 Series User Guide
Setting Up a Windows PC for Configuring the
AcerRouter 700
This section describes the configuration required by LAN-attached PCs which
communicate with the AcerRouter 700, either to configure the 700, or for network
access.
These PCs must have an Ethernet interface installed properly, be connected to the
AcerRouter either directly or through an external repeater hub, and have TCP/IP
installed and configured to obtain an IP address through a DHCP server.
Directly connect a Windows 95/98 PC to the AcerRouter. If TCP/IP is not already
installed, follow the steps below for its installation.
Note: Any TCP/IP capable workstation can be used to communicate with or
through the AcerRouter 700. To configure other types of workstations, please consult
the manufacturer’s documentation.
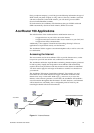
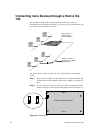
Step 1 Connect your PC to one of the AcerRouter 700 Ethernet ports. If you
connect to LAN port 1, make sure the Uplink switch is set to the Normal
position. See Figure 2-2.
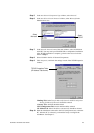
Step 2 From the Win95/98 Start Button, select Settings, then Control Panel. The
Win95/98 Control Panel displays.
Step 3 Double-click on the Network icon.
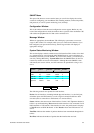
Step 4 Check your list of Network Components in the Network window
Configuration tab. If TCP/IP has already been installed, go to Step 8.
Otherwise, select Add to install it now.
Installed components
Add button
Look for TCP/IP
Client for Microsoft Networks