


AcerRouter 700 Series User Guide 6-13
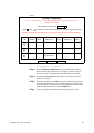
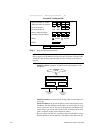
following screen:
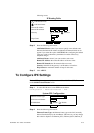
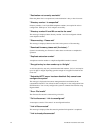
Step 2 Enter the following information:
Add Default Route: select if you want to specify a new default route.
Note that the Remote IP Address and Remote IP netmask fields do not
appear if you select this option. CAUTION: Mis-configuring the default
route may result in abnormal system behavior and/or unnecessary
telephone charges.
Add Static Route: select if you want to add a static route.
Remote IP Address: the remote IP address of the new route.
Remote IP Netmask: the IP netmask of the new route.
Gateway: identifies if the gateway is an IP address or interface.
Hop Count: the maximum number of hops for this route.
Step 3 Click APPLY.
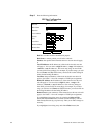
To Configure IPX Settings
Note: IPX options appear only if you selected Share NetWare (IPX) Resource
on the SMART Customization screen.
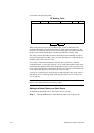
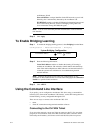
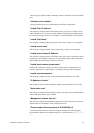
Step 1 To select IPX Protocol, select IPX from the Menu:
Configuration - Advanced Features - IPX:
Step 2 Enter the following information:
Ethernet Frame Type: the Ethernet frame type on the LAN, normally
detected automatically by the AcerRouter 700, however you may change
this selection. Options are Ethernet_802.3, Ethernet_802.2, Ethernet_II,
APPLY
IP Routing Table
Remote IP Address
Remote IP netmask:
Gateway
IP Address
Interface
. . .
. . .
Hop Count:
CANCEL
LAN
Add Static Route
Add Default Route
1
APPLY
System IPX Configuration
IPX Network Number
Ethernet Frame Type
Ether802.3
1088224
IPX RIP/SAP
Enable Disable