


3-6 AcerRouter 700 Series User Guide
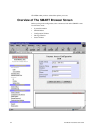
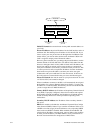
Err Pkts: indicates the number of error (bad) packets that have been received.
Disconnect: if an interface has been selected (highlighted), clicking this button will
cause the connection to be taken down. The LAN interface and the ISDN physical lin
e are not affected by this operation.
Clear: resets the selected statistics values to zero.
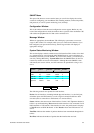
What is a Connection Profile?
To access the Internet, you need to apply for an account with an ISP (Internet Service
Provider), who will provide you with the phone number that you need to call, as well
as your name and password that the ISP will use for authentication purposes. You nee
d to enter such information into a “connection profile” in the AcerRouter 700. Like
wise, a connection profile needs to be created for each dial-in user, each remote office
, or each VPN user.
Essentially, a connection profile contains all information that the AcerRouter needs to
access the Internet, or support a remote dial-in user, or set up a connection with a re
mote office, or create a VPN. Such information includes dial-up phone numbers, au
thentication information (the local user name and password and possibly the remote
site user name password), plus other information that may be required for the commu
nication.
Configuring A Basic Internet Access Profile
You will find that the AcerRouter 700 is optimized for Basic Internet Access. You
don’t need to understand, apply for or assign any IP addresses in your entire network
- the AcerRouter 700 does these things for you automatically. You need to configure
each device on your LAN in a uniform way as described in Chapter 2.
What is Basic Internet Access? It means accessing the Internet, surfing the web, acce
ssing a remote FTP server (to send or receive files), and sending and receiving e-mail.
These are the tasks that users perform most.
(If you want to install publicly accessible computers on your network such as e-mail,
web, and ftp servers, see “Setting Up Internet Access with Advanced Features” later
in this chapter.)
When you apply for an account with your Internet Service Provider (ISP), you will be
given the necessary information, including your account name, account password, an
d the ISP’s local access ISDN telephone number. Have these available and then
follow the steps below.
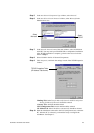
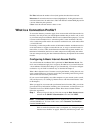
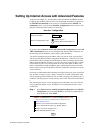
Step 1 When you logon for the very first time, accept the Basic Internet Access
selection in the SMART Customization screen and click NEXT.
Note: The SMART Customization screen is displayed the very first time you in
voke the SMART tool. To return to this screen, select Customize User Interface
from the SMART Menu.
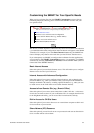
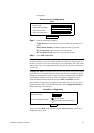
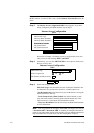
If this is not the first time the router is configured, see “Configuring More
Internet Access Profiles” on page8. Otherwise, the following screen. will