


Installation and Wiring
12
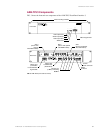
VTM-D15/A 15" MultiMedia Touch Panel Systems
2. Discharge the static electricity from your body by touching a grounded metal object.
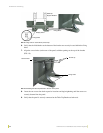
3. Disconnect any other connectors from the TPI/3 input module.
4. Remove (counter-clockwise) the two black thumbscrews on the input module.
5. Slide the module out of the enclosure.
6. Repeat steps 4 and 5 for other slots, as required.
7. Ensure that all thumbscrews are secured and reconnect all rear panel connectors.
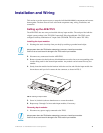
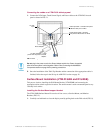
Mounting the TPI/3 in an equipment rack
Use the supplied mounting brackets for 19" equipment rack installations. Remove the mounting
brackets for flat surface installations. You will need a Phillips screwdriver to install the TPI/3.
To install the AXB-TPI/3 in an equipment rack:
1. Discharge the static electricity from your body by touching a grounded metal object.
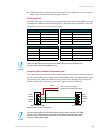
2. Install the mounting brackets using the screws supplied with the unit, as shown in FIG. 6.
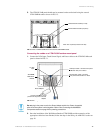
3. With the rack mount brackets installed, place the AXB-TPI/3 into the equipment rack, and
align the mounting bracket holes with the mounting holes on the equipment rack. Start the
mounting screws on both sides of the controller and tighten.
4. Thread the incoming AXlink, power cable (optional) and VTM-D15/A (DB-15 video and
Touch Screen signal cables) through the opening in the equipment rack. Refer to the
Configuration and Setup section on page 23 for more detailed information.
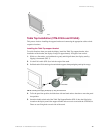
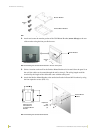
Setting up the Panel
The setup of the MultiMedia Touch Panel involves unpacking the unit, attaching the particular type
of panel support (Table Top or Surface Mount), and connecting the appropriate cables.
1. Remove the panel from the shipping case.
2. Lay the back of the panel on a flat surface.
3. Remove the dust-proof plastic sheet (FIG. 7) from the screen (if applicable).
FIG. 6 Installing mounting brackets