


Getting to Know Your Computer 41
What You Can Do
Several people can share a single computer by logging in to their individual user accounts.
Users can select their own customized settings, such as bookmark and desktop views, and
access their own private storage space, called a Home folder. Users sharing the computer
also have access to a common Shared folder.
The first user account created on your computer is designated an administrator.
Administrators are users with special privileges: they can give new users access to the
computer, install software, and change general computer settings.
Note: If you forget the administrator password, you can reset it using the Mac OS X CD.
Start up from the Mac OS X CD and choose Reset Password from the Installer menu. Because
a user with the Mac OS X CD can gain unrestricted access to the computer, you should keep
the CD in a safe place.
To Get Started
1
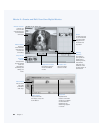
Create a new user:
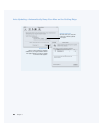
m In Mac OS 9, choose Control Panels from the Apple (K) menu, then choose Multiple
Users from the submenu. Turn on Multiple User Accounts, then click New User.
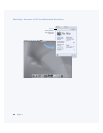
m In Mac OS X, choose System Preferences from the Apple (K) menu, click Users, then
click New User.
2 Edit the user’s information. You can give a user administrative privileges.
3 Close the window.
Tips and Tricks
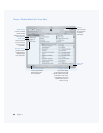
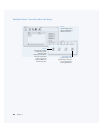
Keeping your computer secure
You can require a password to access the computer after the screen saver appears in case
users log in and leave the computer unattended. Open System Preferences, click Screen
Saver, and click Activation to select the period of inactivity before the screen saver starts.
Then select “Use my user account password.”
Set up user privileges
In Mac OS 9, administrators can specify the documents and applications that users can access
and configure overall settings such as a Welcome message and the default desktop
environment. For details, search for “Multiple Users” in Mac Help in Mac OS 9.
To Learn More
For more information on setting up user accounts in Mac OS X, search for “users” in
Mac Help.