


About This Manual
How to Use This Guide
The initial implementation of an AUDIX Voice Power system involves setting up
both AUDIX Voice Power and the telephone switch. Some of the AUDIX Voice
Power parameters depend on how the switch is being used in support of your
business. Please read the entire guide before beginning any task. Some of
the information about switch-oriented tasks may be useful in planning or
implementing the AUDIX Voice Power-oriented tasks. This guide discusses
the AUDIX Voice Power-oriented tasks before it discusses the telephone
system-oriented tasks and considerations.
As you use this document, you will see references to AUDIX Voice Power forms.
Blank AUDIX Voice Power forms that can be torn out (on perforations) and
reproduced are provided in the AT&T AUDIX™ Voice Power Planning Guide
and Forms.
Conventions Used in this Guide
The following conventions are used in this guide:
Commands and text you should type appear
in this style of type.
Values, instructions, and prompts that appear on the screen are shown
in this style of type.
Key names that are always located on the keyboard in the same place
appear in round-cornered boxes, as in (Enter).
Touch-Tone keys on the telephone set keypad are enclosed in squares,
such as [3] and [#].
A plus sign (+) is used to indicate an operation in which one key is held
down while another is pressed. For example, (Ctrl) + (Alt) + (Del)
indicates that the (Ctrl) key should be held down while the (Alt) and (Del)
keys are pressed.
AUDIX Voice Power function keys (keys that start with an F, followed
by a number), appear in boxes with the current meaning following in
parentheses such as [F3] (SAVE).
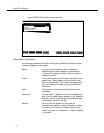
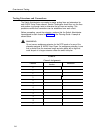
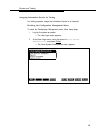
The current meanings of the function keys are shown by labels at the
bottom of the screen. On the actual screen, one of two sets of labels will
appear. The first label is the meaning of the function key when the screen
first appears. These meanings have been selected to be the most useful
for that screen.
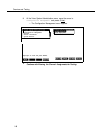
The second set of labels appears after [F8] (CHG-KEYS) has been
pressed. Pressing [F8] (CHG-KEYS) again restores the first set of labels.
iii