


10
Installation: Configuration
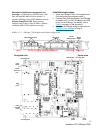
2.1 Getting an IP address
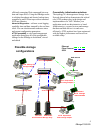
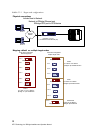
Set up your iPBridge by first getting an IP address, then use ATTO ExpressNAV to map devices.
The iPBridge is set up by default to request an IP
address from a DHCP server. If you do not have a
DHCP server to assign IP addresses to devices,
get an IP address from your network
administrator.
Use the QuickNAV utility from the CD included
with your iPBridge to find your iPBridge on your
network.
1 Work from the computer attached to the
iPBridge on the same broadcast domain. Find
and download the QuickNAV utility,
QuickNAV-windows.exe, from the CD
included with your iPBridge.
2 Turn on the iPBridge.
Wait for the iPBridge Ready LED to light, up to
three minutes, before proceeding.
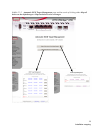
3 Run the QuickNAV application.
a. Click Next on the QuickNAV Wizard
page.
b. Select your iPBridge serial number
from the list of choices displayed.
c. Click Next.
• If you are using DHCP, note the IP
Address assigned by the server:
_________________________________
• If you are not using DHCP, configure the
iPBridge with the IP Address and
Subnet Mask given to you by your
network administrator.
_________________________________
_________________________________
d. Click Launch Browser.
Your browser will point to the
ExpressNAV splash screen.
4 Enter the username and password values.
Note
The default values are username: “root” and
password: “Password”. The username is case
insensitive and the password is case sensitive.
The iPBridge Status page appears.
5 Go on to Target management
on page 11.