


CHAPTER IV -5
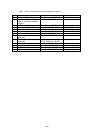
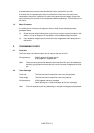
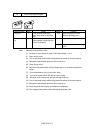
3.2 Troubleshooting Image Defects
The following procedures should be followed in the event of specific image defects.
See subsection 3.3 for information about the location of the high-voltage contacts and
grounding contacts.
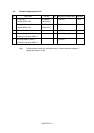
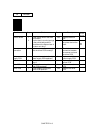
I-1 Light
Possible cause Step Check Result Remedy
HV.GND
contacts
(Fig.4-5)
Density dial 1 Is the density dial in the center
of the click position?
No Set it to the center
detect position.
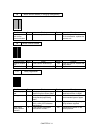
Toner sensing
failure
(printer side)
2 Can printing be started with the
drum unit removed?
Yes Toner sensor failure.
Check if the toner
sensor needs
cleaning and check
the toner sensor
connection.
Toner sensing
failure
(toner cartridge
side)
3 Is the problem solved when 4 or
5 pages are printed after the
toner cartridge is replaced with
a full one?
Yes The wiper of the toner
cartridge is defective.
Replace the toner
cartridge.
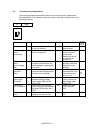
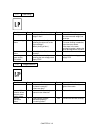
Drum
connection
failure
4 Is all the contacts (HV, GND)
connected with electrode when
the drum unit is installed?
No Clean contact
electrodes both in the
printer body and on
the drum unit.
High-voltage
power supply
PCB failure
5 Check the harness connection
between the high-voltage
power supply PCB and the
driver PCB.
No If the connection is
normal, replace the
high-voltage power
supply PCB.
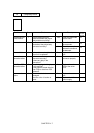
Driver PCB or
main PCB failure
6 Perform the same check as
step 5 above and also between
the driver PCB and the main
PCB.
No Replace the driver
PCB or the main
PCB.
Scanner unit
failure
7 Is the problem solved by
repealing the scanner unit?
Yes Replace the scanner
unit.