


Setting Up a Computer as a File Server
3-60
3
Using a TCP/IP Network
IMPORTANT
•
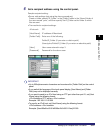
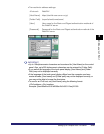
To use the host name of the above example for [Host Name], it is necessary to use
a DNS server. (This applies even if the machine and the FTP server are in the
same subnet.) If no DNS server is available, the host name setting should be
specified using the IP address of the FTP server.
•
Up to 128 alphanumeric characters can be entered for [Host Name] on the control
panel. Also, up to 255 alphanumeric characters can be entered for [Folder Path].
•
If you switch the language of the touch panel display, [Host Name] and [Folder
Path] may not be displayed correctly.
•
If you want to send to an IPv4 host using an FTP port other than port 21, set [Host
Name] using the following format:
<IPv4 address of FTP server>:<Port number>
Example: 192.168.1.21:21000
•
To send to an IPv6 host, set [Host Name] using the following format:
<IPv6 address>:<Port number>
Example: [5aed:90a0:bc05:01d2:568a:2fc0:0001:12ee]:21000
Mac OS X
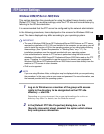
1
Log in to Mac OS X as Administrator ➞ start the FTP services
under Mac OS X.
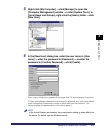
2
Click the [Sharing] icon ➞ [Allow FTP access] ➞ click [Show
All] on the toolbar.
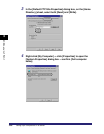
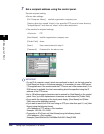
3
Click [Users] to open the [Users] window ➞ enter the name of
the user to whom you want to send data from the machine
through Mac OS X ➞ enter the password.
Enter a user name, and a password not longer than 24 alphanumeric characters.
4
Create a shared folder to which files are to be sent.
Sample setting:
Create a folder named "iR_Folder" in the [Public] folder in the [Home] folder.
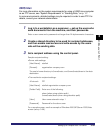
5
Select the shared folder created in step 4 ➞ select [Show Info]
from the [File] menu ➞ select [Privileges] from [Show] ➞
enable read & write access to the folder by the owner and
members of the group to which the owner belongs.