


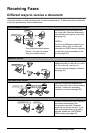


37Receiving Faxes
4 Use [{] or [}] to select <INK SAVER>, then press [Start/Copy].
5 Use [{] or [}] to select <ON> or <OFF>, then press [Start/Copy].
6 Press [Stop/Reset].
Setting ends and the fax returns to standby mode.
Receiving to Memory Temporarily
You can enable/disable memory receiving feature temporarily by selecting <AUTO PRINT>
when [Menu] is pressed.
1 Press [Menu].
2 Use [{] or [}] to select <DATA REGSTRATION>, then press [Start/Copy].
3 Use [{] or [}] to select <PRINTER SETTINGS>, then press [Start/Copy].
4 Use [{] or [}] to select <AUTO PRINT>, then press [Start/Copy].
5 Use [{] or [}] to select <ON> or <OFF>, then press [Start/Copy].
6 Press [Stop/Reset].
Setting ends and the fax returns to standby mode.
z If you select <ON> in step 5, received faxes will be printed automatically.
z If you select <OFF> in step 5, the fax starts receiving documents in memory. The LCD
displays <AUTO PRINT OFF>.
Changing Calling Volume
1 Press [Menu].
2 Use [{] or [}] to select <DATA REGSTRATION>, then press [Start/Copy].
3 Use [{] or [}] to select <USER SETTINGS>, then press [Start/Copy].
4 Use [{] or [}] to select <VOLUME CONTROL>, then press [Start/Copy].
5 Use [{] or [}] to select <CALLING VOLUME>, then press [Start/Copy].
6 Use [{] or [}] to change the volume, then press [Start/Copy].
7 Press [Stop/Reset].
Setting ends and the fax returns to standby mode.
Note
If the <AUTO PRINT> setting is set to <OFF>, the following will not be printed automatically:
ACTIVITY REPORT, TX REPORT, RX REPORT, MULTI TX REPORT and MEMORY CLEAR
REPORT.