


39Receiving Faxes
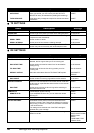
Setting Caller ID
If the <CALLER ID> setting is set to <ON>, the caller’s name and phone/fax number appear on the
LCD when you receive a call.
1 Press [Menu].
2 Use [{] or [}] to select <DATA REGSTRATION>, then press [Start/Copy].
3 Use [{] or [}] to select <CALLER ID>, then press [Start/Copy]. The LCD displays
<OFF>.
4 Use [{] or [}] to select <ON> to enable the <CALLER ID> feature, then press
[Start/Copy].
To disable the <CALLER ID> feature, use [{] or [}] to select <OFF>, then press
[Start/Copy].
5 Press [Stop/Reset].
Setting ends and the fax returns to standby mode.
Documents Stored in Memory
Printing the MEMORY LIST
Your fax can print a list of documents stored in memory, along with the transaction number (<TX/
RX NO.>) of each document. Once you know the transaction number of a document in memory,
you can print it or delete it.
1 Press [Menu].
2 Use [{] or [}] to select <MEMORY REFERENCE>, then press [Start/Copy].
3 Use [{] or [}] to select <DOC. MEMORY LIST>, then press [Start/Copy].
Printing a Document in Memory
1 Press [Menu].
2 Use [{] or [}] to select <MEMORY REFERENCE>, then press [Start/Copy].
3 Use [{] or [}] to select <PRINT DOCUMENT>, then press [Start/Copy].
Note
z To use this feature, you will need to subscribe for a caller ID service. The <CALLER ID> feature uses
the Telcordia or the ETSI EN 300 778-1 protocol. Contact your local telephone company for detailed
information on this service.
z If the <CALLER ID> setting is set to <ON>, the machine will not enter the power saver mode (see
page 12).
TX/RX NO. 0001