


44 Settings and Activity Reports
Settings and Activity Reports
Selecting a Menu
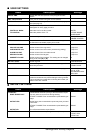
The <USER SETTINGS>, <REPORT SETTINGS>, <TX SETTINGS>, <RX SETTINGS>,
<PRINTER SETTINGS>, <SYSTEM SETTINGS>, and <CALLER ID> menus allow you to customize
the way your fax works. Each menu contains settings that control different functions of your fax.
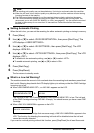
1 Press [Menu].
2 Use [{] or [}] to select <DATA REGSTRATION>, then press [Start/Copy]. The
LCD displays <USER SETTINGS>.
3 Use [{] and [}] to scroll through the menus and select the menu you want.
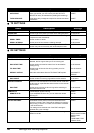
You can select the <USER SETTINGS>, <REPORT SETTINGS>, <TX SETTINGS>, <RX
SETTINGS>, <PRINTER SETTINGS>, <SYSTEM SETTINGS> or <CALLER ID> menu (see
page 45).
4 Press [Start/Copy] to access the settings under the menu you selected.
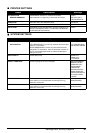
5 See the tables on the following pages (see page 45) for guidelines on selecting and
registering settings.
z Use [{] and [}] to scroll through the settings.
z To register a setting or access a sub-setting, press [Start/Copy].
z To return to a previous level, press [Menu].
6 Press [Stop/Reset].
Setting ends and the fax returns to standby mode.
Note
z If at any stage you want to return to standby mode, press [Stop/Reset].
z If you pause for more than 120 seconds while accessing a menu, the fax will automatically
return to standby mode.