


37
E
User Characters
You can create up to four user characters and store them in memory. You can
create a character from scratch, or you can use an existing character or sym-
bol as a basis for your new character.
User Character Drawing Techniques
The following are the basic techniques for drawing on the user character screen.
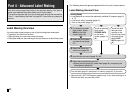
To draw characters
Use the cursor keys to move the cursor around the character creations screen.
• FUNCTION c and FUNCTION v makes the cursor jump to the far left or
far right of the screen (when “CONTINUE” is not highlighted).
• FUNCTION x and FUNCTION z makes the cursor jump to the top or
bottom of the screen (when “CONTINUE” is not highlighted).
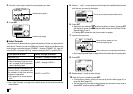
To draw a dot
Press 1 to draw a black dot at the cursor position or 2 to draw a white dot.
To draw a series of black dots
Press 1 to select “BLACK”, and then press 3 to select “CONTINUE”. In this
condition, a continuous series of black dots will be drawn when you move the
cursor.
To draw a series of white dots
Press 2 to select “WHITE”, and then press 3 to select “CONTINUE”. In this
condition, a continuous series of white dots will be drawn when you move the
cursor.
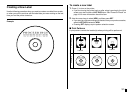
To create a user character using an existing character
1. Input the character or symbol you want to use as a basis for your new
character and locate the cursor under the character.
2. Press USER CHR.
3. Use the cursor keys to select “MAKE” and then press SET.
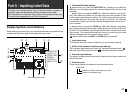
4. Use the cursor keys to select “USE INPUT CHAR” and then press SET.
• The input screen will show an image of the character you input in step 1.
• If you selected “NEW”, a screen appears for creating a character from
scratch.
5. Use the user character drawing techniques in the left column of this page
to change the image on the screen.
6. After you are finished changing the character, press SET.
7. Use the cursor keys to select the user character area where you want to
store the character and then press SET.
• If the user character area you select already has a character in it, the old
character will be replaced with the new one.
8. In response to the confirmation message that appears, press SET to store
the character.
• If there was no input character at the cursor location when you pressed
USER CHR in step 2, the screen for creating a new character from scratch
appears when you press SET in step 3.