


57
E
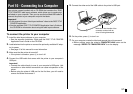
Part 10 - Connecting to a Computer
Your printer comes bundled with a CD-ROM that contains the “DISC
TITLE PRINTER” label layout software, which allows you to create origi-
nal labels on your computer. Then you can use the bundled USB cable to
connect the printer to your computer and print the labels.
Important!
• In this manual, the term “label layout software” refers to the DISC TITLE
PRINTER application.
• See the separate DISC TITLE PRINTER Application User’s Guide on
the CD-ROM for information about using the label layout software.
To connect the printer to your computer
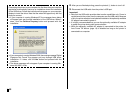
1. Install the label layout software on your computer.
• See the separate Installation Guide and the DISC TITLE PRINTER
Application User’s Guide on the CD-ROM.
2. Load batteries into the printer or connect the optionally available AC adap-
tor for power.
• See page 15 of this manual for more information.
3. Make sure that the printer is turned off.
• If the printer is turned on, press ] to turn it off.
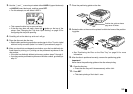
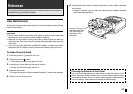
4. Connect the USB cable that comes with the printer to your computer’s
USB port.
Important!
• Connect the cable directly to one of your computer’s USB ports. Hub
connection or other indirect connection can cause misoperation of the
printer.
• Before using the printer’s USB port for the first time, you will need to
remove the sticker that covers it.
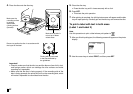
5. Connect the other end of the USB cable to the printer’s USB port.
6. On the printer, press [ to turn it on.
7. On your computer, create the label and execute the print command.
• Before printing, press the printer’s COMPUTER LINK button so the
message “READY TO TRANSFER DATA” is on the display.
Make sure that the side of the
connector marked with an
arrow is facing downwards.