


3-10
Book Title
78-13113-06 B0
Chapter 3 Installing and Removing the Uplink Cards
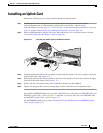
Installing an Uplink Card
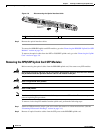
Installing the OC48 SFP Modules in the RPR/SRP Uplink Card
Use the information in this section to install OC48 SFP modules in the RPR/SRP uplink card.
Note Use only OC48 SFP modules purchased from Cisco Systems.
To install a bale clasp OC48 SFP module in the uplink card, perform the following steps:
Step 1 Attach an ESD-preventive strap to your wrist, and to the router or to a bare metal surface. (See the
“Preventing Electrostatic Discharge” section on page 2-4.
)
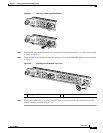
Step 2 Remove any SFP cage covers by pulling the cage cover from the SFP cage.
Step 3 Hold the SFP module with the hardware label facing up, as illustrated in Figure 3-1.
Caution The SFP module must be inserted with the hardware label facing up to avoid damaging the SFP module
or uplink card.
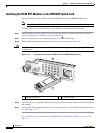
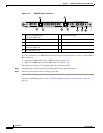
Figure 3-12 Installing the Bale Clasp SFP Module in the RPR/SRP Uplink Card
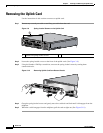
Step 4 Close the bale clasp on the SFP module by pushing the clasp in the upward direction before inserting the
SFP module.
Step 5 Insert the SFP into the appropriate OC48 port and gently push on it until the SFP module snaps into the
slot. (See Figure 3-12.)
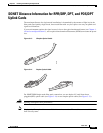
Go to “SONET Distance Information for RPR/SRP, DPT, and POS/DPT Uplink Cards” section on
page 3-11.
1 RPR/SRP uplink card 2 OC48 SFP module
122091
ACTIVE
CARRIER
RX PKT
PASS THRU
PROTECT
1
10720-RPR-SFP
30-1299-01
1000Base-LX
1
2