


2-9
Installation and Upgrade Guide for Cisco Unified Videoconferencing 3545 MCU Release 5.1
OL-11899-01
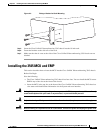
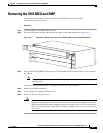
Chapter 2 Installing the Cisco Unified Videoconferencing 3545 MCU
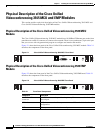
Initial 3545 MCU Configuration
Procedure
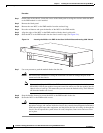
Step 1 Connect the RS-232 terminal cable to the PC terminal.
Step 2 Connect the power cable.
Step 3 Start the terminal emulation application on the PC.
Step 4 Set the communication settings in the terminal emulation application on the PC as follows:
–
Baud rate: 9600
–
Data bits: 8
–
Parity: None
–
Stop bits: 1
–
Flow control: None
Step 5 Turn on the power to the MCU.
A log of the auto-boot events appears on the computer.
Step 6 When the message “Press any key to start configuration” appears on the screen, press any key within six
seconds.
The network configuration Main menu appears as follows:
Press any key to start configuration...
Main menu
N: Configure default network port values
P: Change the configuration software password
S: Configure network security level
A: Advanced configuration menu
Q: Quit
Select:
Step 7 At the prompt, enter N to configure default network port values and press Enter.
Step 8 At the Enter IP address for default interface prompt, enter the IP address you want to assign to the MCU
and press Enter.
Caution Do not use leading zeros in the IP address.
Step 9 At the Enter Default Router IP Address prompt, enter the IP address of the router associated with the
segment in which the unit will be installed and press Enter.
Subnet mask for the MCU if applicable
Domain Name Server and domain name for MCU
if applicable
PC with available serial port and terminal
emulator software installed
RS-232 terminal cable (shipped with the unit)
Table 2-3 Requirements for Setting the IP Address
Requirements Notes