


2-19
Installation and Upgrade Guide for Cisco Unified Videoconferencing 3545 MCU Release 5.1
OL-11899-01
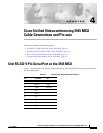
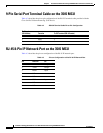
Chapter 2 Installing the Cisco Unified Videoconferencing 3545 MCU
Using the 3545 MCU Setup Wizard
Using the 3545 MCU Setup Wizard
The MCU setup wizard runs automatically the first time you access the MCU Administrator interface.
In the setup wizard, you can configure addressing for the MCU IP, H.323 gatekeeper, and Session
Initiation Protocol (SIP) proxy. In the setup wizard, you can also set the regional date and time settings
of the device on which you manage the MCU.
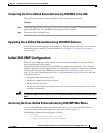
Procedure
Step 1 In the Administrator interface, click MCU
Step 2 On the toolbar, click Setup Wizard.
The MCU Setup Wizard dialog box appears, displaying the Board Settings section.
Step 3 To change the IP address information with which the MCU is currently configured, follow these steps:
–
In the IP address field, enter the IP address you want to assign to the MCU.
–
In the Subnet mask field, enter the subnet mask you want to assign to the MCU.
–
In the Router IP address field, enter the IP address of the router that you want the MCU to use.
–
Click Next.
The H.323 Settings section appears.
Step 4 To set the gatekeeper you want the MCU to use, follow these steps:
–
In the Gatekeeper IP field, enter the IP address of the gatekeeper that you want the MCU to use.
–
In the Gatekeeper Port field, enter the port number that the MCU can use to communicate with
the gatekeeper.
–
Click Next.
The SIP Settings section appears.
Step 5 To change SIP configuration, follow these steps:
–
In the Proxy IP field, enter the IP address for the SIP proxy.
–
In the Proxy Port field, enter the port for the SIP proxy.
–
In the Default Domain field, enter the default domain for the SIP proxy.
–
Select Using Microsoft LCS if the SIP proxy communicates with a Microsoft Live
Communication Server device.
The Date and Time Settings section appears.
Step 6 To synchronize the MCU clock with the clock on the current computer, select Update to local time.
Step 7 Click Finish.