


2-22
Catalyst 3750-X and 3560-X Switch Hardware Installation Guide
OL-19593-01
Chapter 2 Switch Installation
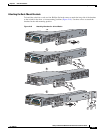
Connecting to the StackPower Ports (Catalyst 3750-X Switches)
Caution Removing and installing the StackWise cable can shorten its useful life. Do not remove and
insert the cable more often than is absolutely necessary.
When you need to remove the StackWise cable from the connector, make sure to fully unscrew the
correct screws. When the connectors are not being used, replace the dust covers.
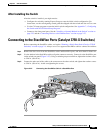
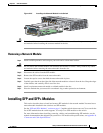
Connecting to the StackPower Ports (Catalyst 3750-X Switches)
Before connecting the StackPower cables, review the “Planning a StackPower Stack (Catalyst 3750-X
Switches)” section on page 2-8. Always use a Cisco-approved StackPower cable to connect the switches.
To prevent misconfiguration, the StackPower ports on the switch and the XPS-2200 are keyed and have
colored stripes that match the keying and stripes on the StackPower cable connectors.
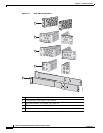
Follow these steps to connect the StackPower cable to the StackPower ports:
Step 1 Remove the dust covers from the StackPower cable connectors.
Step 2 Connect the end of the cable with a green stripe to either StackPower connector on the first switch. Align
the connector correctly, and connect the cable to a StackPower port on the switch rear panel.
(
Figure 2-23).
Step 3 Connect the end of the cable with the yellow stripe to another Catalyst 3750-X switch (to configure
StackPower power sharing) or to an XPS-2200 power supply (to configure redundancy).
Step 4 Hand-tighten the captive screws to secure the StackPower connectors in place.
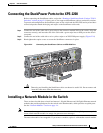
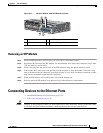
Figure 2-23 Connecting the StackPower Cable to a StackPower Port
Caution Removing and installing the StackPower cable can shorten its useful life. Do not remove and
insert the cable more often than necessary.
AC OK
AC OK
C
3KX-PWR-715WAC
PS OK
S-PWR
XPS
S-PWR
253213