


E-54
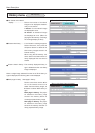
Supported OS
Windows XP, Windows Vista (64-bit version excluded)
NOTE
The operating systems prior to Windows 2000 are out of the operation guarantee range of the iP Viewer.
CPU Celeron 800MHz or greater (CPU recommended for Windows Vista)
Memory Windows XP: 256MB or greater, Windows Vista: 1G or greater
HD empty space 500MB or more recommended. (drive capacity of the temporary folder)
Display resolution
XGA (1024 x 768 ) or more
NOTE
When the resolution is less than the above level, the pointer, etc. of the IP Viewer is not displayed properly.
For how to change the resolution, see the help on your PC.
USB port USB 2.0
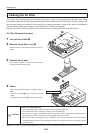
Viewing the iP Viewer’s Operating Instructions
The Intelligent Projector includes a presentation application called “iP Viewer” offering convenient annotation and data
storage functions. Use the procedure below to read the operating instructions and be sure to use the projector properly.
The USB device driver is loaded in the projector’s memory. The projector must be connected to the computer using a
USB cable in order to install the USB device driver* on the computer.
This is a driver allowing the computer to identify the projector as a large capacity USB removable device. It is installed automatically on the
computer when the projector is connected to the computer’s USB port.
Computer operating conditions
The conditions described below must be satisfied in order for iP Viewer to operate properly.
Acrobat Reader (4.15 or newer) must be installed on your computer in order to view the iP Viewer’s oper-
ating instructions.
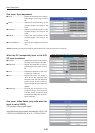
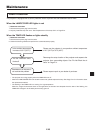
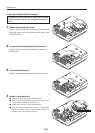
Preparations:Before connecting, check that the projector’s power is turned off.
1
Connect the computer and projector with the RGB cable.
This connection is not required if you simply want to view the operating instructions. (This connection is for projecting images on the com-
puter.)
2
Turn on the power of both the computer and projector.
3
Connect the projector and computer using the USB cable.
Once connected, installation of the USB device driver starts automatically.
For instructions on connecting see the projector’s “User’s Manual”.
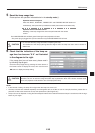
4
Once installation is finished, a message asking you to restart the computer appears. Click
the “Restart” button.
This completes USB device driver installation.
5
When the computer is restarted, the “iP-Viewer start?” mes-
sage appears. Click the “OK” button.
iP Viewer is launched.
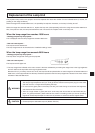
If installation does not start automatically
• Installation will not start automatically if the computer’s CD-ROM auto start setting is
disabled. If this is the case, enable it. (See the computer’s help file for instructions on
changing the setting.)
• Using Explorer, etc., double-click on the “BootAP.exe” file in the drive called “UD-ROM”
(the iP Viewer CD-ROM drive’s volume name).
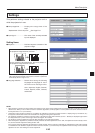
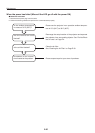
6
Click the “settings” button at the bottom left of the iP Viewer
window.
The settings window appears.
7
Click the “manual” button.
The “Language Select” PDF file opens.
Click “English” to open the “iP Viewer Software Program Operating Instructions”.
To quit, select “Quit” from the “File” menu on the menu bar.
In Acrobat 6.0, select “Quit Acrobat” from the “Acrobat” menu on the menu bar.
Be sure to quit iP Viewer and disconnect the USB cable properly, as described
in “2-2. Quitting the Program and Disconnecting the USB Device” on page 9 of
the PDF file operating instructions.
NOTE
NOTE