


64 Installing System Components
Removing a Hot-Plug SAS or SATA Hard Drive
NOTICE: Not all operating systems support hot-plug drive installation. See the operating system documentation to
confirm that the operating system supports this feature.
1
Remove the bezel. See "Removing the Bezel" on page 43."
2
Take the hard drive offline and wait until the hard-drive indicator codes on the drive carrier signal that
the drive can be removed safely. See Table 1-5 for a list of hard-drive indicator codes.
If the drive has been online, the drive status indicator will blink green two times per second as the drive
is powered down. When all indicators are off, the drive is ready for removal.
See your operating system documentation for more information on taking the hard drive offline.
3 Remove the drive. See "Removing a Hard Drive from a Lever-Release Drive Carrier" on page 59.
Cooling Shroud
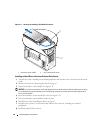
Removing the Cooling Shroud
CAUTION: Only trained service technicians are authorized to remove the system cover and access any of the
components inside the system. Before performing any procedure, see your Product Information Guide for
complete information about safety precautions, working inside the computer, and protecting against electrostatic
discharge.
1
Turn off the system, including any attached peripherals, and disconnect the system from the electrical
outlet.
2
Open the system. See "Opening the System" on page 43.
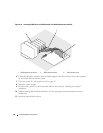
3
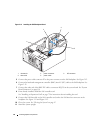
Disconnect the power cables and hard-drive interface cable connectors from the SAS backplane (if
applicable) or hard drives.
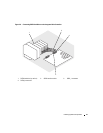
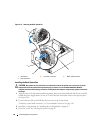
4
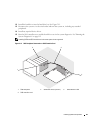
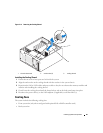
Press the shroud release tab on the back panel toward the power supply. See Figure 3-14.
5
Lift the cooling shroud out of the system. See Figure 3-14.