


78 Installing System Components
11
(Optional) Press <F2> to enter the System Setup program, and check the
System Memory
setting on
the main
System Setup
screen.
The system should have already changed the value to reflect the newly installed memory.
12
If the value is incorrect, one or more of the memory modules may not be installed properly. Repeat
step 1 through step 11 of this procedure, checking to ensure that the memory modules are firmly
seated in their sockets.
13
Run the system memory test in the system diagnostics. See "Running the System Diagnostics" on
page 112.
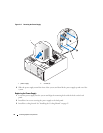
Removing Memory Modules
CAUTION: Only trained service technicians are authorized to remove the system cover and access any of the
components inside the system. Before performing any procedure, see your Product Information Guide for
complete information about safety precautions, working inside the computer, and protecting against electrostatic
discharge.
1
Turn off the system, including any attached peripherals, and disconnect the system from the electrical
outlet.
2
Open the system. See "Opening the System" on page 43.
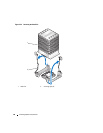
3
Locate the memory module sockets. See "System Board Connectors" on page 118.
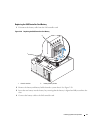
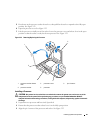
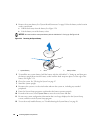
4
Press down and out on the ejectors on each end of the socket until the memory module pops out of the
socket. See Figure 3-21.
5
Close the system. See "Closing the System" on page 47.
6
Stand the system upright.
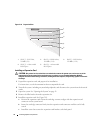
Microprocessor
You can upgrade the system processor to take advantage of future options in speed and functionality.
A processor upgrade kit contains the following items:
• Processor
• Thermal grease packet and/or a replacement heat sink
If your kit does not include a replacement heat sink, you must reuse the processor heat sink currently in your
system.
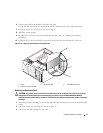
NOTICE: If your upgrade kit included a thermal grease packet, you must use the thermal grease as instructed to
ensure the proper thermal operating condition for the processor. Failure to do so will result in damage to your
system.