


90 Installing System Components
9
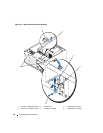
Connect the following cables to the system board. See "System Board Connectors" on page 118.
• Optical-drive interface cable (PRIMARY_IDE connector)
• Diskette-drive cable (FDD connector)
• Control panel cable (FRONT_PANEL connector)
• Front fan cable (FRONT_FAN connector)
10
Install all expansion cards and connect any interface cables to the appropriate components in the
system. See "Installing an Expansion Card" on page 72.
11
Reinstall the drive bay and secure it with the four Phillips screws. See "Installing a Hard Drive in the
Drive Bay" on page 55.
12
Reconnect the SAS or SATA interface cable(s) to the system board or optional hard-drive controller
card.
Ensure that you reattach the interface cables in their original locations.
13
Reconnect the power cables to the hard drives in the drive bay, or to the optional SAS backplane.
14
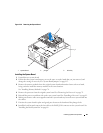
Replace the cooling shroud. See "Installing the Cooling Shroud" on page 65.
15
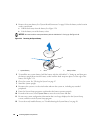
Connect the two power cables to connectors PWR_CONN and 12V on the system board.
16
Carefully check for any remaining cables or components that are not installed or are improperly seated
in their connectors on the system board.
17
Close the system. See "Closing the System" on page 47.
18
Stand the system upright.
19
Reconnect the cables to the I/O connectors on the system back panel.
20
Reconnect the system to its electrical outlet and turn the system on, including any attached
peripherals.