


Adding and Replacing Parts 177
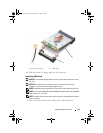
NOTE: Lift the keyboard carefully in
step 4
to ensure that you do not pull on the
keyboard cable.
4
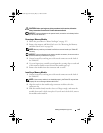
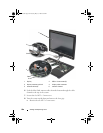
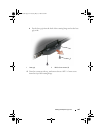
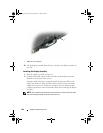
Rotate the keyboard up 45-degrees to gain access to the keyboard
connector.
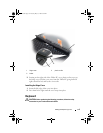
5
Lift the keyboard cable locking arm up to access the keyboard cable. Pull
up on the keyboard cable pull-tab to remove the keyboard cable from the
connector. (Do not pull on the keyboard cable pull-tab to disengage the
locking arm. This will damage the connector and or the keyboard cable.)
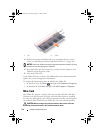
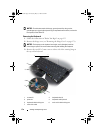
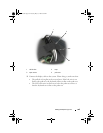
6
Lift the connector locking arm up to access the track stick cable. Pull up on
the track stick cable pull-tab to remove the track stick cable from the
connector. (Do not pull on the track stick cable pull-tab to disengage the
connector locking arm. This will damage the connector and or the
keyboard cable.)
7
Lift the keyboard from the computer and place it to one side.
Installing the Keyboard
NOTE: When you replace the keyboard, ensure that the keyboard tabs are
completely in place to avoid scratching the palm rest.
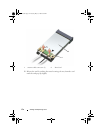
1
Slip the track stick cable into the track stick cable connector on the system
board and press the track stick-cable locking arm down to hold the cable in
place. Use the pull-tabs on the track stick cable to install the track stick
cable into the connector.
2
Insert the keyboard cable into the keyboard cable connector on the system
board and press the keyboard-cable locking arm down to hold the cable in
place. Use the pull-tabs on the keyboard cable to install the keyboard cable
into the connector.
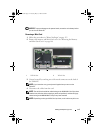
3
Holding the keyboard at a slight angle, insert the four metal tabs of the
keyboard into the four metal slots of the palm rest.
4
Tighten the two M2 x 3-mm screws at the top of the keyboard.
5
Install the hinge cover (see "Installing the Hinge Cover" on page 175).
Coin-Cell Battery
CAUTION: Before performing the following procedures, follow the safety
instructions in your
Product Information Guide
.
book.book Page 177 Tuesday, May 13, 2008 5:03 PM