


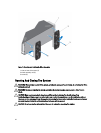

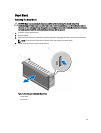
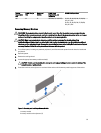

Figure 16. Removing and Installing the Cooling Shroud
1. cooling shroud
2. tab
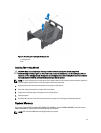
Installing The Cooling Shroud
CAUTION: Many repairs may only be done by a certified service technician. You should only perform
troubleshooting and simple repairs as authorized in your product documentation, or as directed by the online or
telephone service and support team. Damage due to servicing that is not authorized by Dell is not covered by your
warranty. Read and follow the safety instructions that came with the product.
NOTE: For proper seating of the cooling shroud in the system chassis, ensure that the cables inside the system are
routed along the chassis wall and secured using the cable securing bracket.
1. Align the tabs on the cooling shroud with the securing slots on the chassis.
2. Lower the cooling shroud into the chassis until firmly seated.
3. If applicable, install the system cooling fans in the cooling shroud.
4. Close the system.
5. Reconnect the system to its electrical outlet and turn the system on, including any attached peripherals.
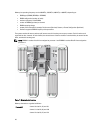
System Memory
Your system supports DDR3 unbuffered ECC DIMMs (ECC UDIMMs), registered DIMMs (RDIMMs), and load reduced
DIMMs (LRDIMMs). It supports DDR3 and DDR3L voltage specifications.
NOTE: MT/s indicates DIMM speed in MegaTransfers per second.
47