


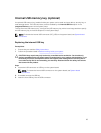

Steps
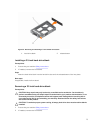
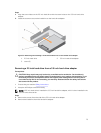
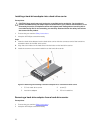
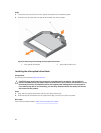
1. Insert the hard drive into the hard-drive carrier with the connector end of the hard drive toward the
back.
2. Align the screw holes on the hard drive with the set of screw holes on the hard-drive carrier.
When aligned correctly, the back of the hard drive is flush with the back of the hard-drive carrier.
3. Attach the screws to secure the hard drive to the hard-drive carrier.
Optical drives and tape drives
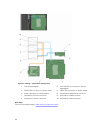
Your system supports one of the following configurations:
System Configurations
Systems with up to eight 3.5 inch hard drives or
sixteen 2.5 inch hard drives
Up to three SATA half height optical drives
Up to three SATA/SAS/SCSI tape drives
A combination of optical and tape drives
Systems with up to eight 3.5 inch hard drives or
eight 2.5 inch hard drives in the 3.5 inch hard-drive
carrier, or sixteen 2.5 inch hard drives plus four
PCIe SSDs
Up to one SATA half height optical drive
Up to one SATA/SAS/SCSI tape drive
Systems with up to eighteen 3.5 inch hard drives One optical or tape drive
Systems with up to thirty-two 2.5 inch hard drives One slim optical drive with option to choose from
DVD-ROM or DVD-RW. Tape drives are not
supported.
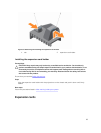
Removing the optical drive or tape drive
Prerequisites
1. Ensure that you read the Safety instructions.
2. Follow the procedure listed in Before working inside your system.
CAUTION: Many repairs may only be done by a certified service technician. You should only
perform troubleshooting and simple repairs as authorized in your product documentation, or as
directed by the online or telephone service and support team. Damage due to servicing that is
not authorized by Dell is not covered by your warranty. Read and follow the safety instructions
that came with the product.
Steps
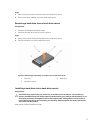
1. Disconnect the power and data cable from the back of the drive.
NOTE: Observe the routing of the power and data cable inside the chassis as you remove them
from the system board and the drive. You must route these cables properly when you replace
them to prevent them from being pinched or crimped.
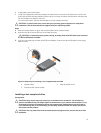
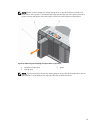
2. To remove the drive, push the release latch as indicated in the figure.
3. Slide the drive out of the drive bay.
4. If you are not immediately replacing the optical drive or tape drive, install the blank.
78