


DI-206 ISDN Remote Router
6
Installation
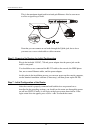
This chapter outlines how to connect your DI-206 to your LAN and ISDN line. Refer
to the diagrams below to identify all of the ports on your device when you make
connections.
Ordering Your ISDN Line
If you do not have an ISDN line installed already, we suggest that you order it from
your telephone company as soon as possible to avoid the long waiting period
common when ordering a new line. Use the information in this section to place the
order. If you have already installed your ISDN line, you can check the following
section to make sure that you can use all the features of your DI-206.
1.
Contact your local telephone company’s ISDN Ordering Center.
2.
Make sure DSS1 switches are available since these are the only switch types
currently supported by the DI-206.
3.
When the telephone company installs your ISDN line, be sure to obtain the
following information:
◊
ISDN switch type.
◊
ISDN telephone number(s).
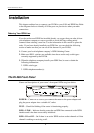
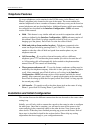
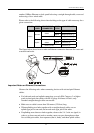
The DI-206 Front Panel
Names and descriptions of your router’s front panel LEDs are given below:
POWER
— Comes on as soon as you connect the router to the power adapter and
plug the power adapter into a suitable AC outlet.
TEST
— Should be blinking if the router is functioning properly.
ISDN – LINK
— Indicates that the router has an ISDN line connected to the ISDN
interface and it has been successfully initialized.
ISDN – B1
and
B2
— On if there is an active ISDN session on that channel or if that
channel is making or receiving a call.