


DI-206 ISDN Remote Router
14
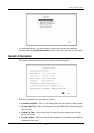
1.
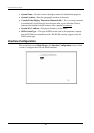
The LAN port must be enabled in the
Interface Configuration
sub-menu.
♦
Choose
Interface Configuration, LAN.
♦
Position the cursor over the State item and press <space bar>. The State will
change from
Disable
to
Enable
.
♦
Position the cursor on the SAVE option at the bottom of the screen and press
<Enter> to save the new setting.
♦
Choose Exit in the sub-menus to return to the
Main Menu
.
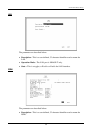
2.
Enable IP Networking
♦
Choose
Network
Configuration, IP Configuration.
♦
Position the cursor over the third item
IP Networking
and press <space
bar> to
Enable
it.
♦
Position the cursor on the Save option at the bottom of the screen and press
<Enter> to save the new setting.
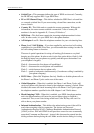
3.
Assign an IP address to the LAN port in the
Network Configuration
sub-menu
of the
Main Menu
.
♦
Still in
Network Configuration, IP Configuration
submenu from Step 2
above, choose
IP Stack Configuration
,
LAN.
♦
Enter a valid IP address for the LAN in the first item. You may also enter a
Netmask if you wish. For more information about IP Addresses and Subnet
masks, please refer to Appendix B, “
IP Concepts
.”
♦
Position the cursor on the Save option at the bottom of the screen and press
<Enter> to save the new setting.
♦
Choose EXIT in the sub-menus to return to the
Main Menu
.
4.
Enable the Telnet/Discovery function on the router.
♦
From the
Main Menu
choose
Advanced Functions
.
♦
Choose the Telnet/Discovery Enable option and then
Enable
Telnet State.
♦
Position the cursor on the Save option at the bottom of the screen and press
<Enter> to save the new settings.
♦
Choose Exit in the sub-menus to return to the
Main Menu
.