


Scanning 203
6
6
6
6
6
6
6
6
6
6
6
6
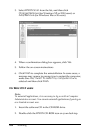
Note:
❏ EPSON Scan and EPSON Creativity Suite are installed in the
standard installation using the installation software CD-ROM. To
scan an original using a network computer, install PageManager
for EPSON from a different CD-ROM that contains PageManager
for EPSON. After installing PageManager for EPSON, start it and
enter the license number according to the on-screen message. Then,
restart the computer.
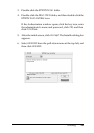
❏ When scanning an original on the document table, the product
automatically recognizes the document type. If the document is
recognized as text, the original is scanned as a black-and-white
document even if it is a color document. To correctly scan a color
original, select Network PC and use Manual Scan, or specify the
detail settings for the image to be scanned in the Home Mode or
Professional Mode using EPSON Scan on your computer. For
details, see “Colors differ from the original.” on page 419
Before using this feature, make sure you have installed
EPSON Scan and EPSON Creativity Suite on your computer.
Follow the steps below to use this feature.
1. Connect this product to your computer with a USB cable or a
network cable according to your environment, and then start
up the computer.
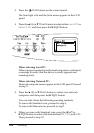
2. Make sure the product is turned on, and then place your
original either on the document table or in the Auto
Document Feeder (fax model only). For details, see “Setting
Your Originals” on page 154.
c
Caution:
To scan an original correctly, set the transportation lock on
the left side of the document table in the unlocked
position. For details, see “Scanner parts” on page 26.