


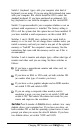
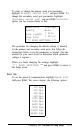
2.
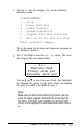
Turn on or reset the computer. You see the following
Operation menu:
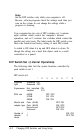
OPERATIONMENU
1 - Setup
2 - Format
hard disk
3 - Format diskette
4 - System diagnostics
5 - Prepare hard disk formoving
0 - Exit to DOS for more utilities
Enter selection number:_
This is the menu for the setup and diagnostics programs on
the Reference diskette.
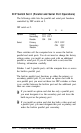
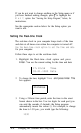
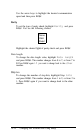
3.
Press
1
and
Enter
to select the
set up
option. The screen
then displays the main Setup
menu:
Exit
Real-time clock
Primary serial port
Secondary serial port
You use and to move the cursor block (the highlighted
bar) through the options on this menu. Once you highlight
the option you
want,
press
Enter to
select it.
Note
Make sure the Num Lock function is off when your are
using the Setup program; otherwise the arrow keys do
not work. The Num Lock indicator on the top right
corner of the keyboard is illuminated when Num Lock is
on.
Changing DIP Switches and Using Setup
A-7