


6-3
Maintaining and Transporting the Printer | 6-3
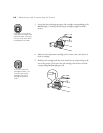
To run the cleaning cycle from the printer’s control panel, press the
Cleaning
button and hold it for at least 3 seconds. The
Pause
light
flashes as the printer cleans its print head. The cleaning cycle takes about
three minutes and does not use any paper.
3. When the
Pause
light goes off, run a test print or a nozzle check to
confirm that the head is clean.
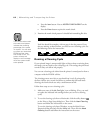
You may need to run the cleaning cycle several times to get a clean
nozzle check pattern. For effective cleaning, always run a test print or
nozzle check between cycles. If the lines on the pattern still appear
broken after several cleaning cycles, contact EPSON for assistance.
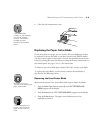
Aligning the Print Head
If banding appears on your prints, or vertical lines are not straight, you need
to align the print head. You can use the Print Head Alignment utility if you
have the EPSON printer driver installed. If not, you can align the print head
using the control panel.
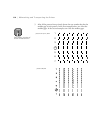
For best results, use EPSON 24-inch roll paper. The process takes about 15
minutes (to print 12 patterns of 7 rows each) and aligns the print head for all
modes and resolutions.
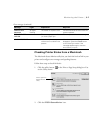
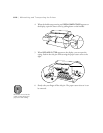
Running the Print Head Alignment Utility
1. Load roll paper in the printer, following the instructions on page 2-3.
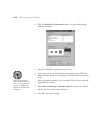
2. Macintosh: click the utility button in the Print or Page Setup dialog
box.
Windows: access the Main Printer Properties dialog box and click the
Utility
tab.
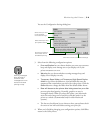
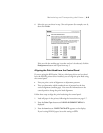
3. Click the
Print Head Alignment
button.
4. Follow the messages on your screen. The head alignment patterns are
printed.
Caution
To avoid damaging the
printer, don’t turn it off
until the cleaning cycle is
finished and the Pause
light has stopped flashing.