


6-5
Maintaining and Transporting the Printer | 6-5
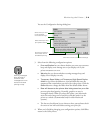
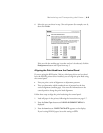
6. Select the row you chose in step 5 for each pattern (for example, row 4),
then click
Finish.
If the set with the smallest gap is unclear and can’t be selected, click the
Realignment
button and repeat from step 5.
Aligning the Print Head from the Control Panel
If you are using the RIP Station 5100 or a third party driver and you don’t
have the EPSON printer driver installed, you can align the print head using
the control panel.
•
First you print a series of alignment or adjustment patterns.
•
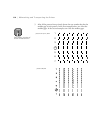
Then you determine which numbered row of patterns has the best
vertical alignment (smallest gaps). You enter the information on the
control panel to change the print head alignment.
Follow these steps to align the print head using the control panel:
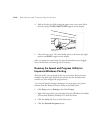
1. Load roll paper in the printer, following the instructions on page 2-7.
2. Press the
SelecType
button until
HEAD ALIGNMENT MENU
is
displayed.
3. Press the
Item
button.
PAPER THICK=STD
appears on the display.
If you’re using EPSON paper, leave this setting on
STD
.