


Quick Start — Integration Seamless Switcher, cont’d
QS-2
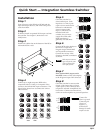
Step 9
If desired, connect a control system or computer to
the Remote RS-232 port.
Step 10
If desired, connect a network WAN or LAN hub, a
control system, or computer to the Ethernet RJ-45
port.
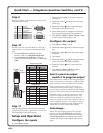
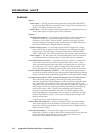
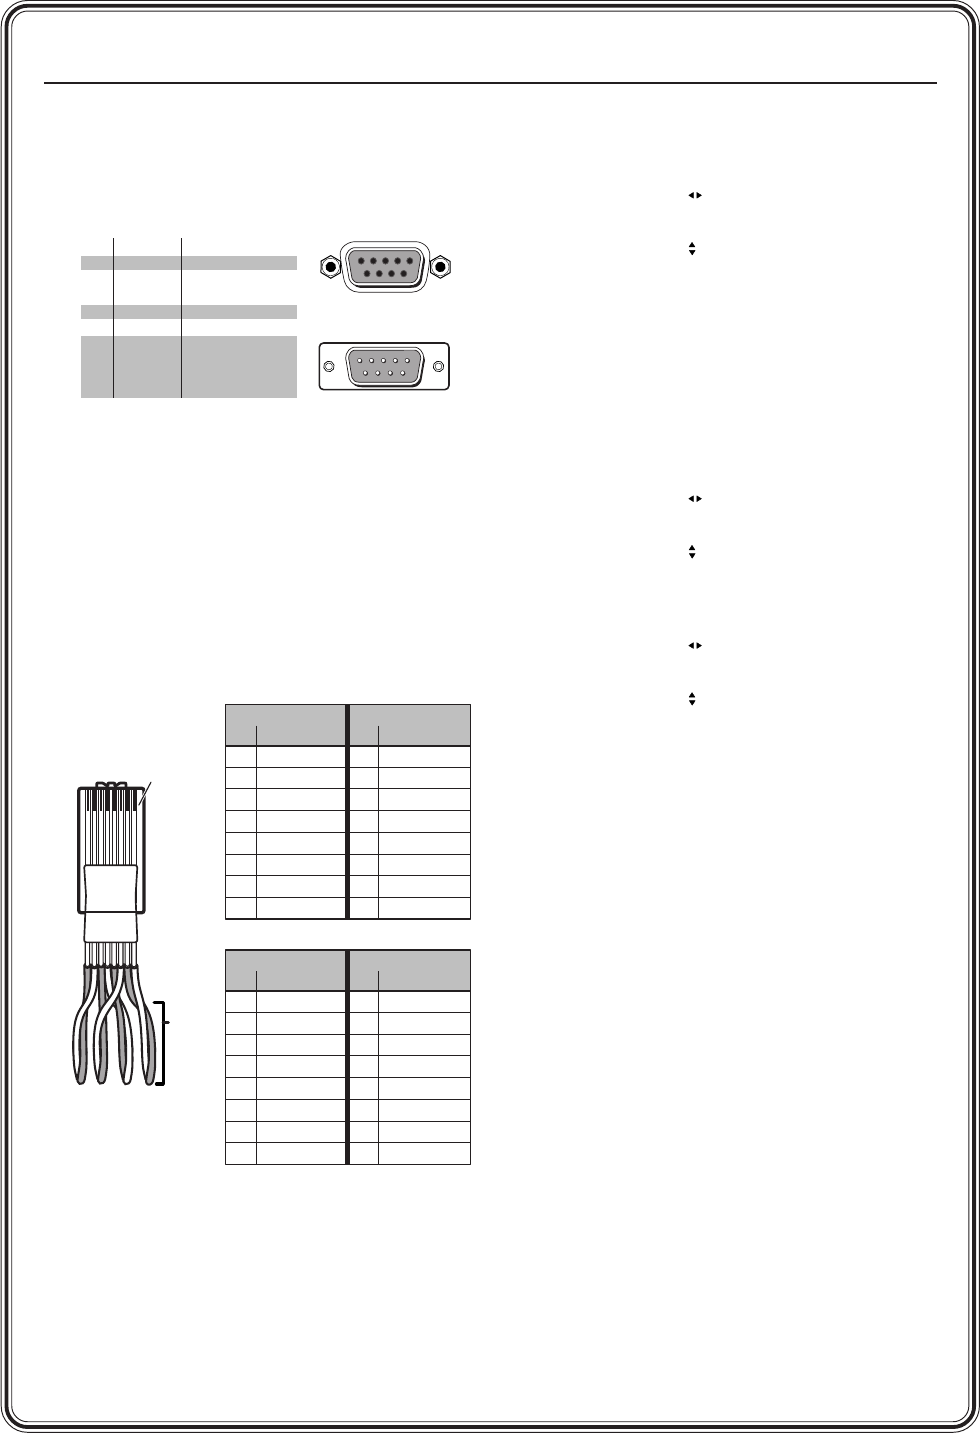
• For connection to a network, wire the
interface cable as a straight-through cable.
• For connection to a computer or control
system, wire the interface cable as a crossover
cable.
Step 11
Plug the Integration Seamless Switcher and input
and output devices into a grounded AC source, and
turn on the input and output devices.
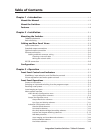
Setup and Operation
Configure the inputs
1. Press Menu > Next.
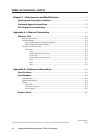
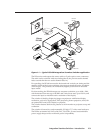
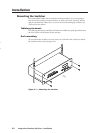
RS-232 FunctionPin
1
2
3
4
5
6
7
8
9
—
TX
RX
—
Gnd
—
—
—
—
Not used
Transmit data
Receive data
Not used
Signal ground
Not used
Not used
Not used
Not used
51
9
5
9
6
Female
Male
1
6
Clip Down
1
1&2
3&6
4&5
7&8
2345678
12345678
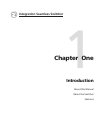
RJ-45
connector
Straight-through cable
Side 1 Side 2
Pin Wire color Pin Wire color
1 White-orange 1 White-orange
2 Orange 2 Orange
3 White-green 3 White-green
4 Blue 4 Blue
5 White-blue 5 White-blue
6 Green 6 Green
7 White-brown 7 White-brown
8 Brown 8 Brown
Crossover cable
Side 1 Side 2
Pin Wire color Pin Wire color
1 White-orange 1 White-green
2 Orange 2 Green
3 White-green 3 White-orange
4 Blue 4 Blue
5 White-blue 5 White-blue
6 Green 6 Orange
7 White-brown 7 White-brown
8 Brown 8 Brown
Twisted
Pairs
2. Press an input button (to select the input to
configure).
3. Rotate the Adjust
knob to select the input
video type.
4. Rotate the Adjust
knob to select the input
audio gain or attenuation level.
5. Select other inputs to configure as necessary
by pressing the appropriate input button.
6. Press Menu > Menu > Menu > Menu > Next
to return the default display cycle.
Configure the output
1. Press Menu > Menu > Next.
2. Rotate the Adjust
knob to select the output
rate.
3. Rotate the Adjust
knob to select the output
frequency.
4. Press Next.
5. Rotate the Adjust
knob to select the output
video sync format (RGBHV or RGBS).
6. Rotate the Adjust
knob to select the sync
polarity.
7. Press Menu > Menu > Menu > Next to
return the default display cycle.
Select a preview output,
switch it to program output
Select video and/or audio to switch by pressing the
Video/Audio button as necessary to light the green
Video LED and/or the red Audio LED as desired.
Press an input button to select a video and/or
audio input for the preview output. The preview
output’s input selection is indicated by the flashing
green (for video) and/or red (for audio) Input LED(s).
Press either the Cut or Dissolve button to switch
the preview output to the program output. Cut
makes an immediate seamless switch. Dissolve
masks the seamless switch with a dissolve effect of
a user-assignable duration. The program output’s
input selection is indicated by the solid green (for
video) and/or red (for audio) Input LED(s).
Auto image
™
Initiate the auto imaging function for a specific
input by pressing and holding the appropriate
input button until the LCD displays the message
Auto Image Input #n, releasing the input button,
and then pressing and releasing the input button
again.