


Operation, cont’d
SW AV Series Switchers • Operation3-8
Video switchers must be in normal (manual) mode.
A
To select video only for the switch, if necessary, press and release the I/O
buttons until the Video LED lights and the Audio LED is off.
B
Press and release the input 4 button. The input 4 LED lights. The video on
input 4 is now selected for output. If the steps in Example 1 have been
completed, the input 1 LED blinks. The current configuration is now video
input 4 and audio input 1 selected for output.
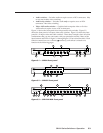
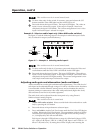
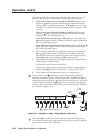
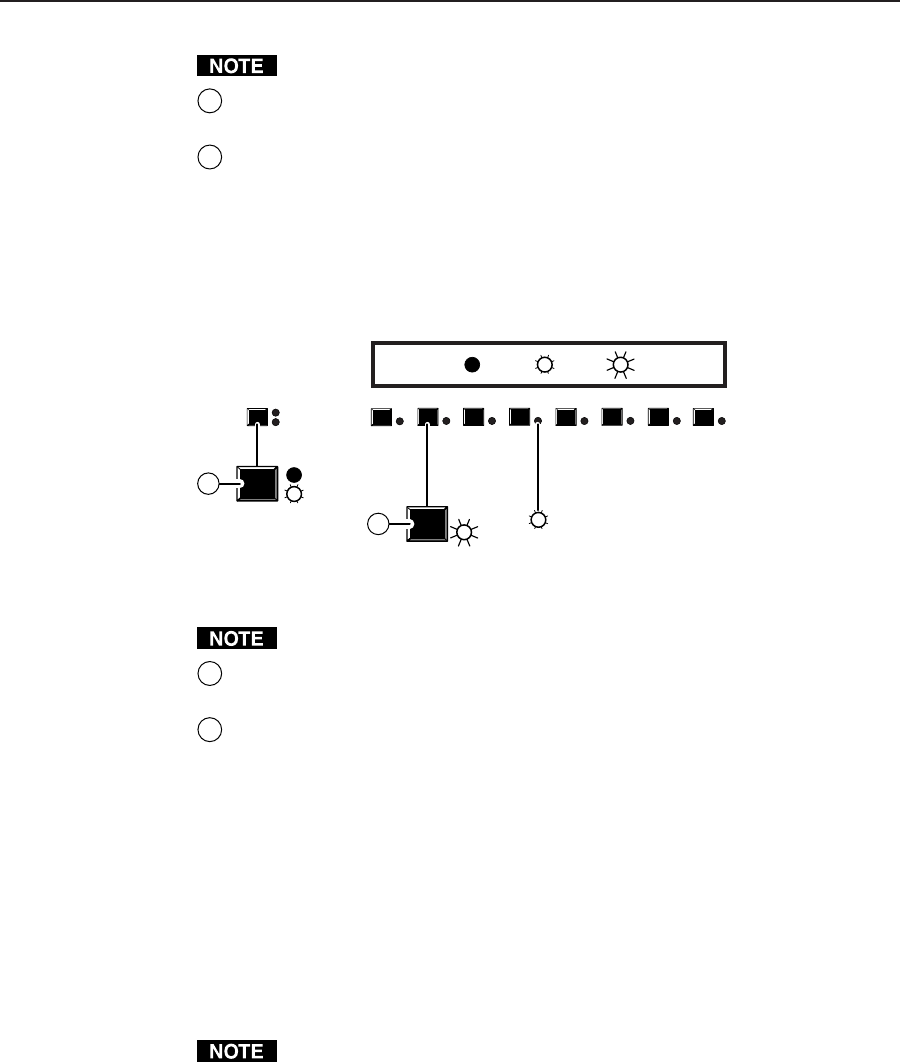
Example 3: Select an audio input only (video AND audio switcher)
See figure 3-7 and the following steps for an example in which the input 2 audio
only is selected for output (audio breakaway).
8
7
6
5
4
32
1
VIDEO
AUDIO
I/O
LED key: = off, = on, = blinking
B
B
VIDEO
AUDIO
A
B
2
2
I/O
I/O
Press
Press
Figure 3-7 — Example 3: Selecting audio input 2
Video switchers must be in normal (manual) mode.
A
To select audio only for the tie, if necessary, press and release the Video and
Audio buttons until the Video LED is off and the Audio LED lights.
B
Press and release the input 2 button. The input 2 LED blinks. The audio on
input 2 is now selected for output. If the steps in Example 1 and 2 have been
completed, the input 4 LED lights steadily. The current configuration is now
video input 4 and audio input 2 selected for output.
Adjusting audio gain and attenuation (audio switchers)
Audio switchers have audio gain and attenuation adjustments. The audio level of
each input can be adjusted through a range of -18 dB to +24 dB to ensure that there
is no noticeable volume difference among sources and to eliminate the need for
separate preamps or attenuators when used with professional (higher line level)
and consumer (lower line level) audio equipment.
The audio level can be adjusted from the front panel or by using Extron’s
Windows-based control program.
Video switchers must be in normal mode.
1.(Video AND audio switcher) Select to switch both video and audio or audio
only by pressing the I/O button.
2. Press and release an input button to select an input.
3. Press and hold the Audio Conf/Save button until the Conf/Save LED begins
to blink. Release the Conf/Save button. The approximate audio level for the
selected input is displayed in the input 1 through 4 LEDs and the polarity (+
or -) is displayed by the +dB and -dB LEDs.
Each input 1 through 4 LED indicates a range of 6 dB when lit (Input 1 LED:
off = 0 db to 5 dB, Input 1 LED: lit = 6 dB to 11 dB, Input 1 and 2 LED: lit = 12
dB to 17 dB, and so on). By noting these LEDs’ displays and counting the