


2-7TPX 88 Matrix Switchers • Installation
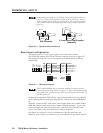
TP T 15HD A
TP R BNC A
TPX88 A
CAT5 T 15HD A
H
-S
H
IF
T
B
U
F
FE
R
ED
C
O
M
P
U
T
E
R
IN
P
U
T
A
U
D
IO
ID PIN 4
ID PIN 11
LO
C
A
L
M
O
N
IT
O
R
RS-232
RS
-422
A
UD
IO
O
U
TPU
TS
L
R
1
L R
2
LR
3
L
R
4
L
R
5
L
R
6
L
R
7
L
R
1
2
3
4
5
6
78
IN
P
U
TS
R
E
M
O
TE
GND
TX-
TX +
RX -
RX +
1
2 3
4
5
6 7
8
O
UTP
U
TS
5
0
-6
0
H
z
1
0
0
-2
4
0
V
0
.3
A
ANAHEIM, CA .
MADE IN USA
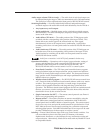
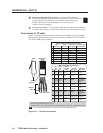
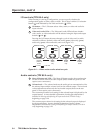
PC Computer
CAT 6 TP Cable
LCD Projector
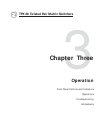
... THEN insert a three foot
extension cable to equalize
UTP skew for red video.
IF cable measurement
of all cables indicates
that the pair with wires
1 and 2
is three feet shorter
than the other signals
(total for all cables)...
Pair RGB video
1, 2 Red
4, 5 Green
7, 8 Blue
RGB INPUT
RGB OUTPUT
R G
B
H/HV
V
A
AUDIO
L
R
B
SOG
C SYNC
POWER
1
5
V
.5
A
D
C
L
R
Figure 2-4 — Pair skew equalization
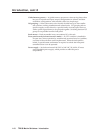
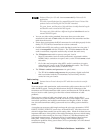
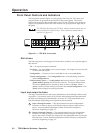
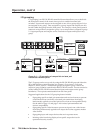
Audio outputs connectors (TPX 88 A only)
The Audio Outputs connectors are 3.5 mm, 5-pole captive screw connectors that
output unamplified, line level audio. The local audio outputs
follow the RJ-45 outputs; that is, if input 6 is tied to output 1, then
audio output 1 is the input 6 audio.
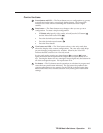
Connect audio devices, such as an audio amplifier or powered
speakers. See figure 2-5 to properly wire an output connector.
Unbalanced Output
Tip
See caution
Sleeve
Tip
See caution
Balanced Output
Tip
Ring
Sleeve (s)
Tip
Ring
Figure 2-5 — Captive screw connector wiring for audio output
CAUTION
Connect the sleeve to ground (Gnd). Connecting the sleeve to a negative
(-) terminal will damage the audio output circuits.
The audio level for each input can be can be individually set, using the front panel
or under RS-232/RS-422 control, to ensure that the output level does not vary from
input to input. See chapter 3, Operation, chapter 4, Programmer’s Guide, and
chapter 5, Switcher Software for details.
By default, the audio output follows the video switch. Audio breakaway, which
can be commanded via the front panel or under RS-232/RS-422 control, allows you
to select from any one of the audio input sources. See chapter 3, Operation, chapter
4, Programmer’s Guide, and chapter 5, Switcher Software for details.