


16
10. Cable Connection and Removal
10-1. Cable Connection
An 8 Port KVM Switch is used as an example to explain how to connect cables. The same
procedures that are described in this section can be applied for 4 Port KVM Switches and 16
Port KVM Switches.
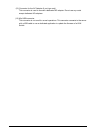
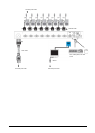
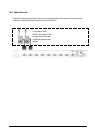
10-1-1. When a Cascade Connection is not Used (Level 1 connection)
The maximum number of servers that can be connected is eight.
(1) Connect the power cable (1) of the server to the power outlet. Make sure the server
power is left OFF.
(2) Connect the keyboard connector, the mouse connector, and the monitor connector of
the first server with dedicated cables (2) (must be ordered separately).
(3) Connect the connectors (3) on the other ends of the dedicated cables to the ports for
server connection on the KVM Switch.
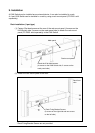
(4) Perform the same connection procedure for the remaining servers (from the second
server to the eighth server). Connect the keyboard, mouse, and monitor to the
[CONSOLE] ports (4).
The monitor connector is used to connect the monitor to a KVM Switch. Even if these
devices are connected to both the PS/2 and USB, only the USB side operates.
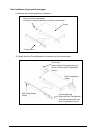
(5) Connect the power cable (5) to the KVM Switch and the power outlet.
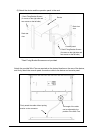
(6) Turn on the power of the monitor, and press the [RESET] switch on the KVM Switch to
read the EDID information of the monitor to the KVM Switch.
(7) Turn on the power of the servers that are to be used.