


2-8 Removal and Replacement HP OmniBook 4100
Removing the Keyboard
(HP Authorized Service Providers Only)
Required Equipment
• Small Phillips screwdriver.
• Probe or tweezers.
Removal Procedure
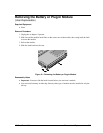
1. Unplug the ac adapter, if present, and remove the battery.
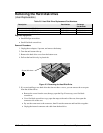
2. On the bottom of the unit, remove the seven “K” screws from the bottom case.
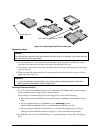
3. Insert your small finger into the PCMCIA opening and push up the top of the keyboard—or you
can lift it from above using a thin flat-blade screwdriver. After lifting the back edge slightly, slide
the keyboard toward the back until the front-left corner is free.
4. With the display tilted only slightly back, lift the front of the keyboard and lean it back against the
display. Be careful not to scratch the display or pull on the cables.
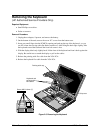
5. Release the pointing stick flex cable from the VGA PCA.
6. Release the keyboard flex cable from the VGA PCA.
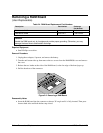
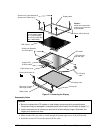
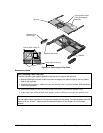
Figure 2-5. Removing the Keyboard
Keyboard and
pointing stick
flex cables
Strip cover
Pointing stick cap
Screw, M2.5×16mm (7)