


2-10 Removal and Replacement HP OmniBook 4100
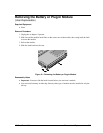
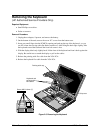
Removing the Display Assembly
(HP Authorized Service Providers Only)
Required Equipment
• Small Phillips screwdriver.
Removal Procedure
1. Unplug the ac adapter, if present, and remove the battery.
2. On the back of the unit, lift up on the VGA connector cover above the VGA port and unsnap it
from the case.
3. Remove the screw above the VGA port.
4. Remove the four “D” screws from the bottom case.
5. Open the display about 90 degrees, then lift off and lay back the combined top-case strip cover
and display assembly.
6. Remove the two screws from the LCD flex cable end and unplug the cable.
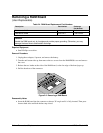
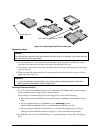
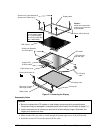
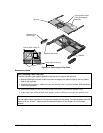
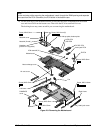
Figure 2-6. Removing the Display
LCD flex cable
Strip cover
Screw, M2×4mm
VGA connector
cover
Screw, M2.5×5mm
Caution:
Install new screws after
removing the two 16mm
screws at the corners.
Screw, M2.5×16mm (2)
Screw, M2.5×19mm
(2)
Screw, M2.5×5mm
(1)