


2-22 Removal and Replacement HP OmniBook 4100
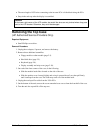
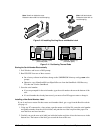
Component Removal Procedures Additional Steps (See figure on page 4-5)
Display Latch
(part of display case kit)
Display (page 2-10). 1. For a 13-inch display, do not remove the LCD
module, but remove the display assembly and
bezel (page 2-11).
For a 14-inch display, remove the LCD module and
brackets from the case, but do not disassemble the
module (page 2-11).
2. Use a flat-blade screwdriver or probe to release
one end of the latch spring.
3. Swing the latch into the display case, then lift it out
of its holders.
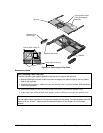
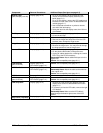
End Cap
Display (page 2-10). 1. Remove the display bezel (page 2-11).
2. Lift out the end cap.
Hinge
Display (page 2-10). 1. Remove the display bezel (page 2-11).
2. Remove the hinges and strip cover from the LCD
brackets, then unsnap the hinge covers.
Hinge Cover
Display (page 2-10). 1. Unsnap the hinge cover from the strip cover.
2. Remove the hinge cover. You may have to change
the hinge position to free the hinge cover.
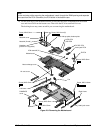
Inverter PCA
Display (page 2-10). 1. Remove the display bezel (page 2-11).
2. On the plastic cable holder, unsnap the cover.
3. Unplug all cables attached to or holding the inverter
PCA. Lift up the PCA if necessary.
Reassembly Notes: Attach cables with tape as in the
original unit.
Caution: Use compatible parts (page 2-11).
LCD Brackets
(part of LCD kit)
Display (page 2-10).
LCD module (page 2-11).
Caution: Use compatible parts (page 2-11).
LCD Flex Cable
Display (page 2-10).
LCD module (page 2-11).
Remove the LCD flex cable from the shield.
Reassembly Notes: Attach the cable to the shield as
in the original unit.
Caution: Use compatible parts (page 2-11).
LCD Module
See page 2-11.
LCD Shield
(part of LCD kit)
Display (page 2-10).
LCD module (page 2-11).
Remove the LCD flex cable from the shield.
Caution: Use compatible parts (page 2-11).
LED Strip Cable
Display (page 2-10). 1. Remove the LCD module and brackets from the
display case, but do not disassemble the module
(page 2-11).
2. If necessary to free the LED cable, remove the right
LCD bracket.
Reassembly Notes: Make sure the LED cable is
routed through the bottom-right corner of the LCD
bracket.
Strip Cover (Top Case)
Display (page 2-10). Unsnap the strip cover from the hinge covers.