


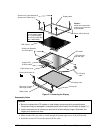


HP OmniBook 4100 Removal and Replacement 2-13
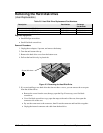
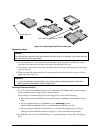
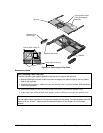
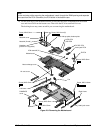
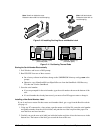
Figure 2-7. Removing the Display
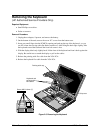
Reassembly Notes
Caution
• Be sure to replace the LCD module or other display components with compatible parts.
Components may be damaged if compatible parts are not used. See the table on page 2-11.
• Install new screws for all screws you remove that hold the display hinges. Otherwise, the
hinges could loosen over time.
• Make sure the LED strip cable is routed through the bottom-right corner of the LCD bracket.
• Install the inverter PCA under the main LCD flex cable.
Screw, M2.5×4mm (6)
Screw cover, upper domed (2)
Screw cover, lower flat (4)
Display bezel
LCD module
Strip cover, hinges,
and hinge covers
Cable holder
LED strip
cable
LCD shield
LCD brackets,
left and right
Screw (size depends
on LCD module)
Inverter PCA
LCD flex cable
Screw, M2.5×4mm (2)
Display case
Note:
14-inch display shown.
For a 13-inch display,
the LCD flex cable and
other details differ.
Cable holder cover
End cap (2)
Caution:
Install new screws after
removing any of the four
circled screws.