


Using Tapes and Caring for Your Drive 33
G:\TW\Lori\Raptor\C4388-90100\exraptor1.fm Page 33
Last Modified: Tuesday, January 27, 1998 8:33 pm
Printing date: Saturday, April 04, 1998
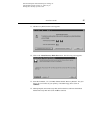
In Windows 95 only, your tape drive can also read from but NOT write to backup
tapes made using Colorado Backup software and a Jumbo 250, 350, 700, 1400;
Trakker 250, 350, or 700; T1000; or T3000 tape drive.
The following section explains how to insert your tapes. Please note the differences
between the HP Colorado cartridges and the standard mini-data cartridge when they
are fully inserted.
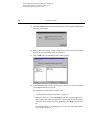
CAUTION: Do not erase C4425 or C4429 tapes with bulk erasers. Magnetic bulk
erasing removes tracking reference points that are placed on the tape at the factory.
Without these points, the tapes cannot be read by your tape drive. The Erase utility in
Colorado Backup is the safest and quickest method of removing data from your tapes.
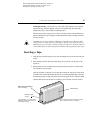
Inserting a Tape
1. Align the tape with the tape-drive door. The record/play area faces the door and goes
in first.
2. Insert the tape with the metal base plate facing away from the colored strip on the
tape drive.
3. Steady the drive with one hand and push the tape into the tape drive with the other.
You will feel it lock into place.
After the cartridge is inserted, you will hear the sound of the tape being wound back
and forth. This sound indicates that the tape drive is finding the beginning of the tape,
determining the tape’s length and format, and positioning the drive’s read/write head.
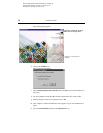
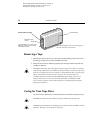
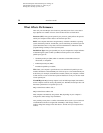
Note the differences between the two cartridge types when they are fully inserted.
HP Colorado cartridge
or
Travan cartridge
Metal base plate
on tape
Colored strip
Approximately 1” (2.5cm) of the
cartridge extends out of the drive
when fully inserted.
The wider HP Colorado cartridge spans the
entire width of the drive’s opening.