


The front panel Copy button is optimized to scan and print a duplicate of what is on
the scanner glass. If you wish to change the image, such as lighten, darken, or adjust
size, use the Make Copies button on the HP Director.
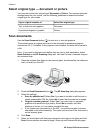
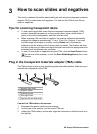
1 Place the original face down on the scanner glass, as indicated by the reference
marks, or face-up in the ADF.
2 Select the copy options:
–
Select the number of copies by pressing the Number of Copies button (
).
The number of copies appears in the front panel display.
– Select how the original is scanned by pressing the Color button (
) or
Black & White button (
).
3 Press the Copy button (
). The copies are printed on the default printer.
Note There is no preview image for the copy function.
If you wish to change any copy settings, use the Make Copies button in HP Director.
An HP Copy dialog box will open where you can select the settings you want for your
copy.
Cancel a scan
Press the Cancel button ( ) to cancel a scan in progress, or to cancel a series of
scans when you are scanning from the ADF.
Use the Power Save button
Press the Power Save button ( ) once briefly to turn off the lamp when not using the
scanner. When you are ready to begin scanning again, just press one of the front
panel scan buttons to turn the lamp back on and begin scanning immediately.
To turn the scanner completely off, press and hold the Power Save button (
) for two
(2) seconds.
To begin scanning again once you have turned the scanner completely off, press the
Power Save button once only.
Change scan settings
You can change many scan settings from the HP Image Zone software. These scan
settings include button settings for the front panel and HP Director scan buttons,
preferences, and automatic exposure. See the onscreen Help in HP Director for more
detailed information. Double-click the HP Director icon on your desktop, or go to
Start, then Programs or All Programs, HP, and then Director. Double-click Help in
the HP Director window. In the Index tab, type settings to find more information.
User's manual 9